Making Fedena Website Mobile-friendly: The Story Behind

Fedena-Mobile
With the role mobile phones play in our lives today, there isn’t a single doubt about the role handheld devices (especially mobile phones) play in taking forward businesses. Reach of business/product is greatly influenced by the number of mobile phone users covered. Not only that, Google has made it clear that websites that do well on mobile will get a solid boost in search ranking as well.

1

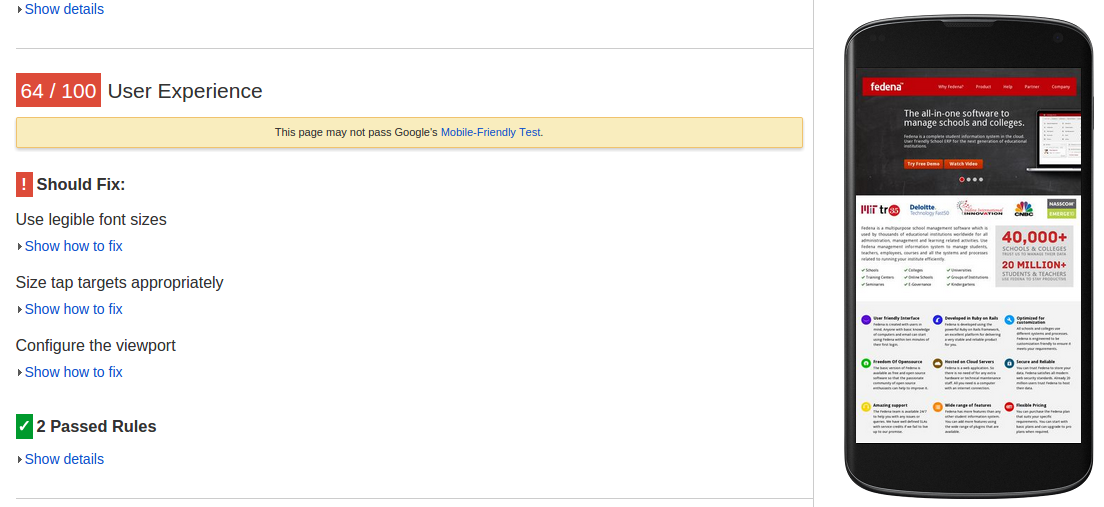
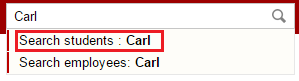
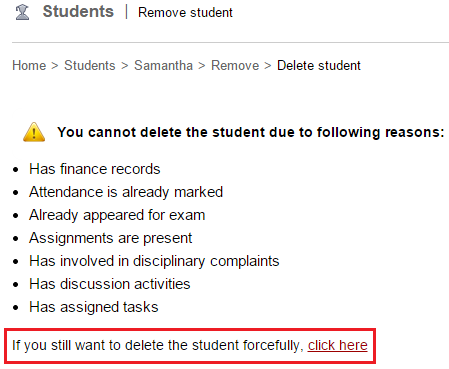
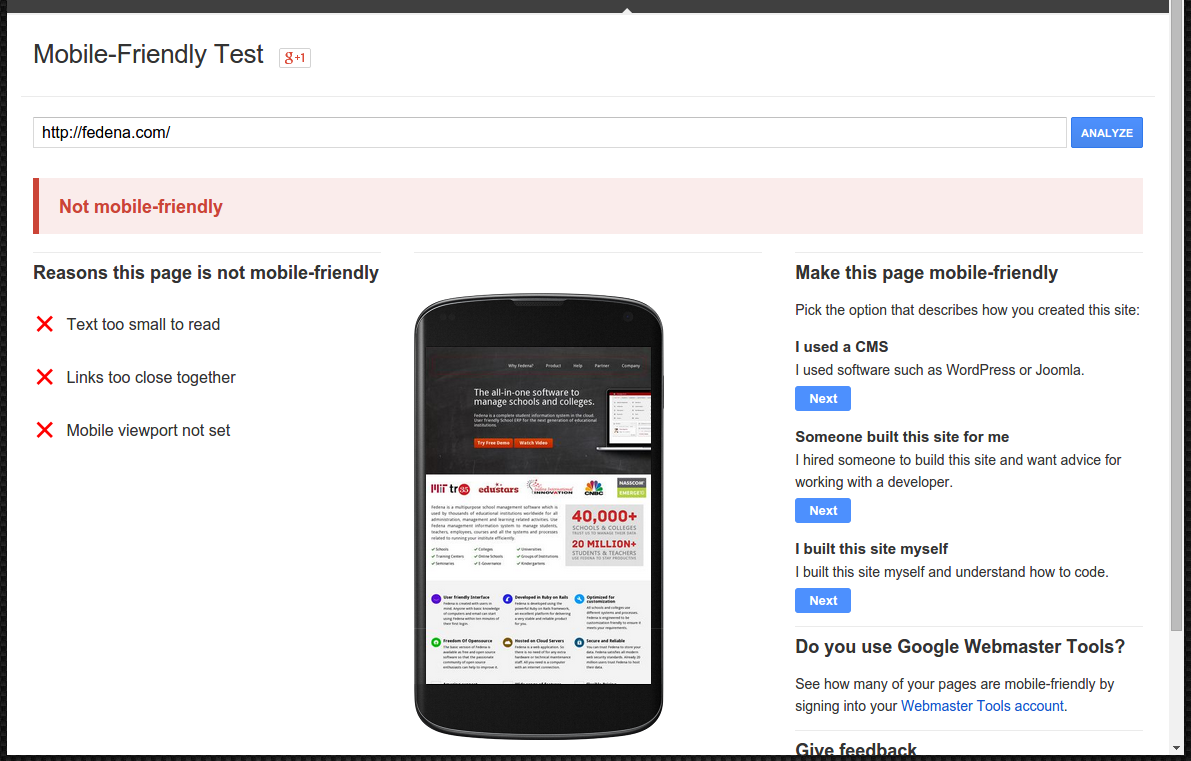
The above image shows the user experience our page (www.fedena.com) provided with respect to mobile users. It clearly depicts that the site is not mobile-friendly. Mobile friendly websites have gained so much importance and popularity that Forbes has included it in their marketing checklist. Delivering audience the content they want, within the context they are viewing it, is the one thing any business should take care of.

Let’s get Started

We wanted to build a mobile-friendly version of our site and there were two approaches to choose from:

  1. Modify the existing version
  2. Build new one from the scratch

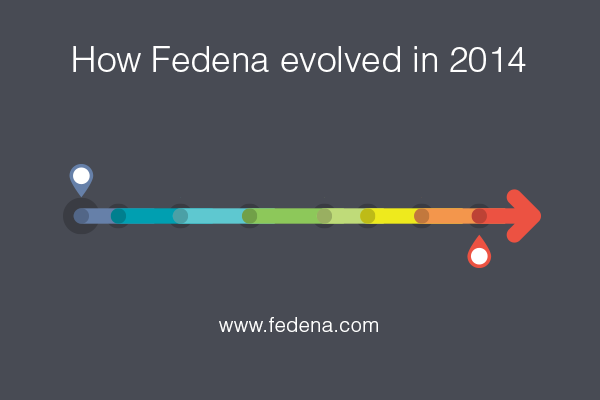
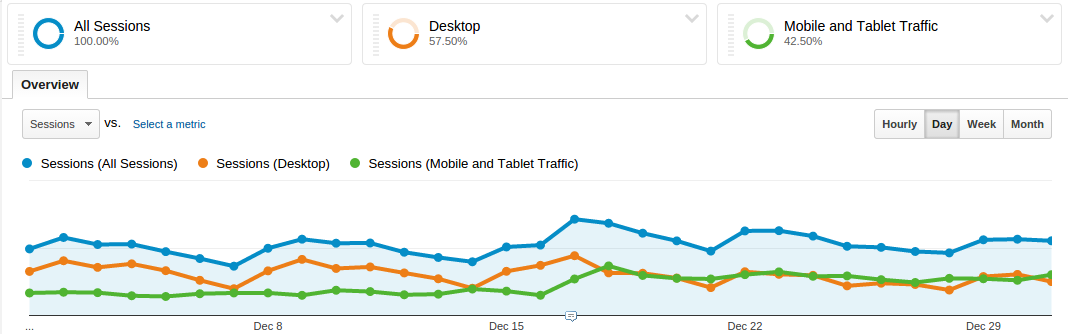
The second approach make things simpler as all you need are a design, an approach and a mechanism of handling various devices, screens and resolutions. At Foradian, our Fedena website was already functional and much in use. So we had to think of the ways to reach out to the entire range of customer base and also we wanted to do it ASAP. The below image shows the distribution of our visitors on different devices:
2

Approaches

For search engines to understand that our website is set up for mobile too, we had to follow one among the three designs that Google has put forward for all the developers:

  1. Responsive Web Design
  2. Dynamic Serving
  3. Separate URLs

Having separate URLs seemed easier to implement as all we had to do was rewrite the contents and provide the views. Once the user tries to open a page through mobile, he/she will be redirected to the mobile version of the site i.e., m.fedena.com just like Yahoo! did earlier. This approach has other constraints like maintaining two versions of the site, being sure that all pages are provided with different views and that a page will have two URLs. Also Bing and Google advocate a one-URL approach for find-ability and SEO. So we thought of going with the other two designs and implementing them.

Our Approach

Dynamic Serving is a setup where the server responds with different HTML (and CSS) on the same URL depending on the User Agent requesting the page. User Agent is the string the browser sends to the server hosting the site which indicates the details of operating system being used, its version, the browser through which the site is being visited and its version so that the server can tailor the site according to the browser. Responsive web design (RWD) is a setup where the server always sends the same HTML code to all devices and CSS is used to alter the rendering of the page on the device. Simply put, Responsive design is a single version that auto-adjusts to display properly on all devices except the oldest cellphones or feature-phones.


However, the first two approaches have an advantage over the Separate URL approach – we need not have to have two separate URLs for the different versions. Also, we need not have to write separate views for each and every page; only the pages that are most important or viewed by many need to be handled.


How about implementing them both? Yes, we implemented both of these setups. Here’s how – depending on the User Agent, we planned to display a different layout. All handheld devices and desktop versions would have a different layout. But if that’s the case, how would we display content according to the screen sizes of handheld devices! That could be done through responsive design. So, it came down to two different layouts depending on User Agent and using media queries for each screen size or a screen size till a limit. Media Queries help in writing different styles for same classes and using them according to the media type and size.

Designing Priorities

At this stage, once the approach has been decided, we needed a design that is simple yet informative. Our aim in designing was to let the users have all the information they need and in the context they like but without sacrificing our content. For all mobile version of sites the top requirements are – a good design that would help users get the basic information he/she needs and the navigation links for every other page, keeping menus short and sweet, putting contact information up and front, providing links and adding videos and other features to keep the user engaged are sure ways to future-proof the site. Even the forms are simplified so that there will be no inconvenience to the user at any point. We have also decided to remind them as to which plan they are interested before filling the form which brings more clarity in them. Our design team did a splendid job and provided us the simplest UI with all the elements.

3

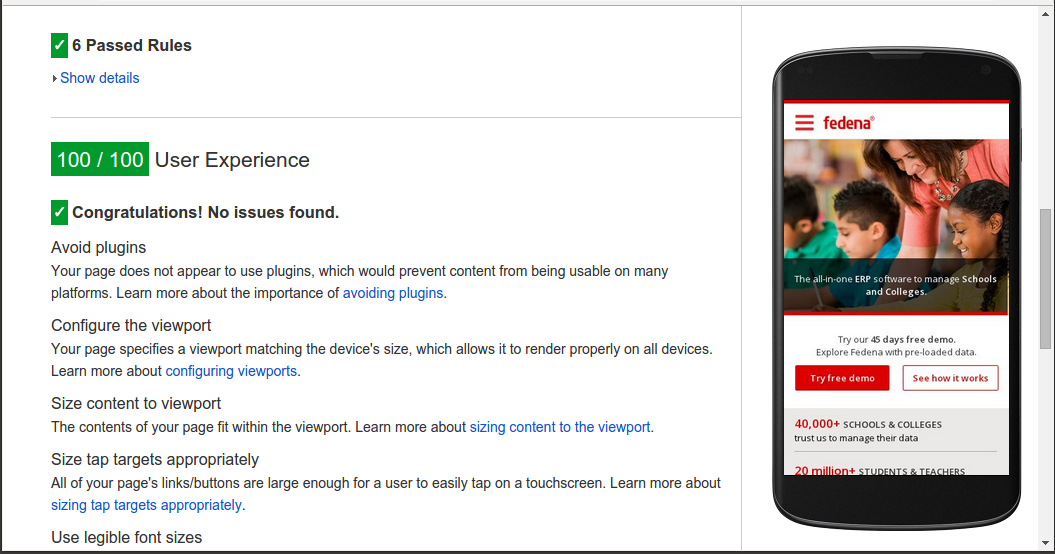
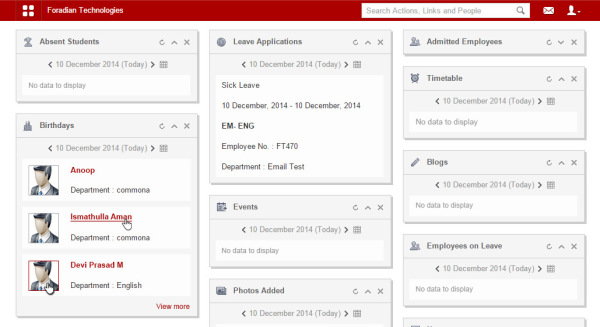
The above screenshot has been taken after Fedena website is made mobile-friendly.

Why a Framework

After getting the design, the first thing that we needed to decide upon was whether to use a framework and which one to use in that case. Challenge was to develop a modular structure that enables the content to best fit any screen size. To write the entire responsive CSS from scratch and making sure it works well in all browsers is a tedious task. That is where these frameworks enter and make life much easier.

Choosing a Framework

Among all the frameworks, Pure by Yahoo! caught our attention as it stands true to how it is described, as “an ultra light-weight and responsive set of CSS modules that can be employed in web projects at ease and they are responsive too !!.” Even though there were many other equally good frameworks along with Pure, its minimal and flat design which ensures that it would stand out of the way if needed was the foremost reason we chose Pure.
4 
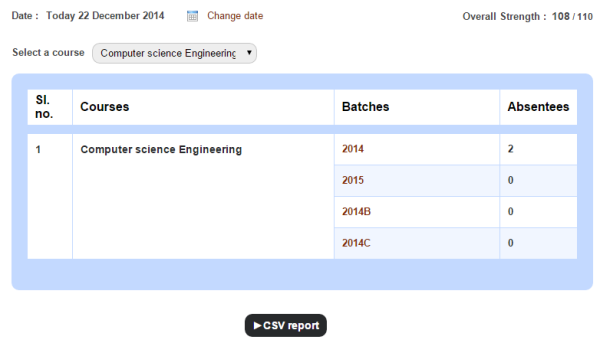
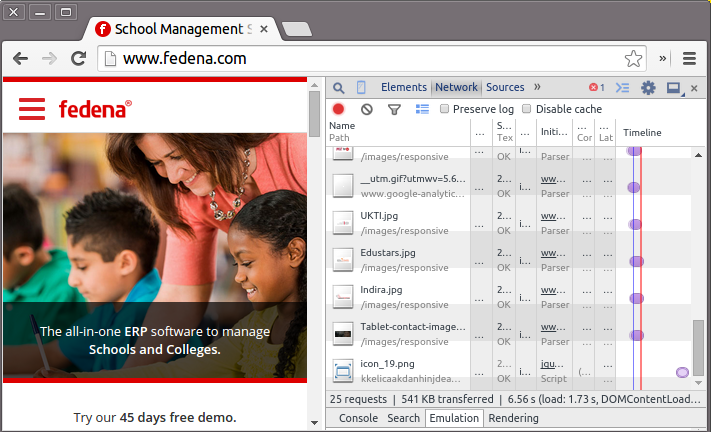
The above screenshot shows the size of the loaded page (541 KB) which is much smaller than the size of the desktop version. The page load size when viewed on a mobile internet device compared to being viewed on a desktop browser is comparatively smaller as the entire framework minified and Gzipped is only 19KB .

Development of the mobile version with design and frameworks and more

Featuring a video, content hiders, menu links as simple as they seem, implementing all these  might be a little difficult if we choose to ignore all the resources and plugins present. However, with the thousands of jQuery plugins and scripts present to assist in implementation, the developer just needs to choose the one that suits his/her requirement. In our case, we were happy with what jQueryUI accordion was providing and it took lesser time than writing it from scratch. We choose Owl Carousel, a touch enabled jQuery plugin that allowed us to create the beautiful responsive sliders. Apart from that the optimal use of jQuery/Javascript functionality made the implementation part much easy.

5

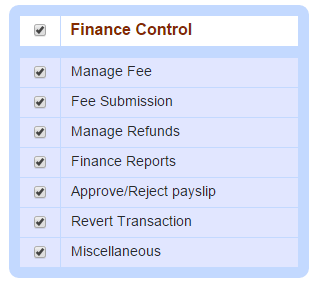
Now for a quick comparison, the below screenshot was taken before we started working on our website to make it mobile friendly.


6

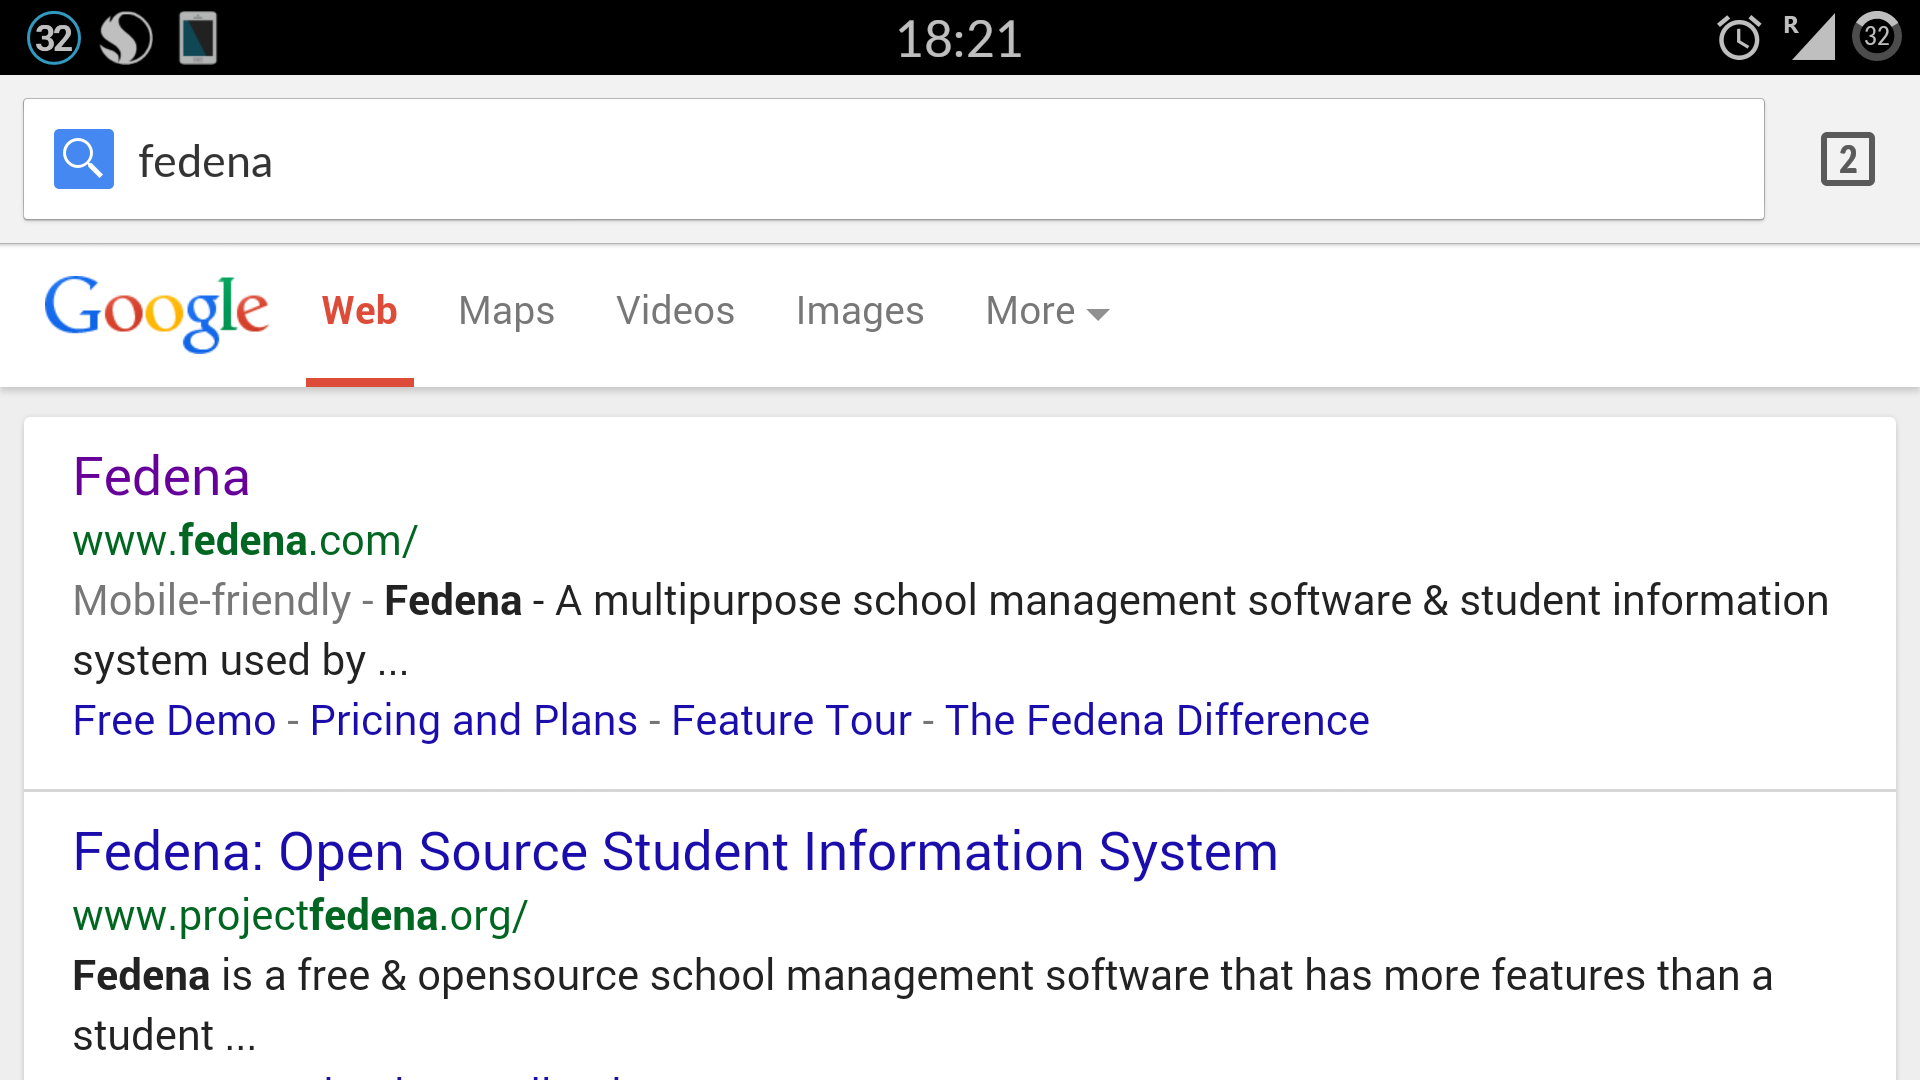
Our Fedena website is now a mobile-friendly site. For a company that encourages its team to think like a customer, we are happy that our customers are now able to connect with us through their mobiles without any difficulty. More and more users are now accessing our site from their devices without any inconvenience. We are able to reach out to a wider user base, thanks to our mobile-friendly website.


7

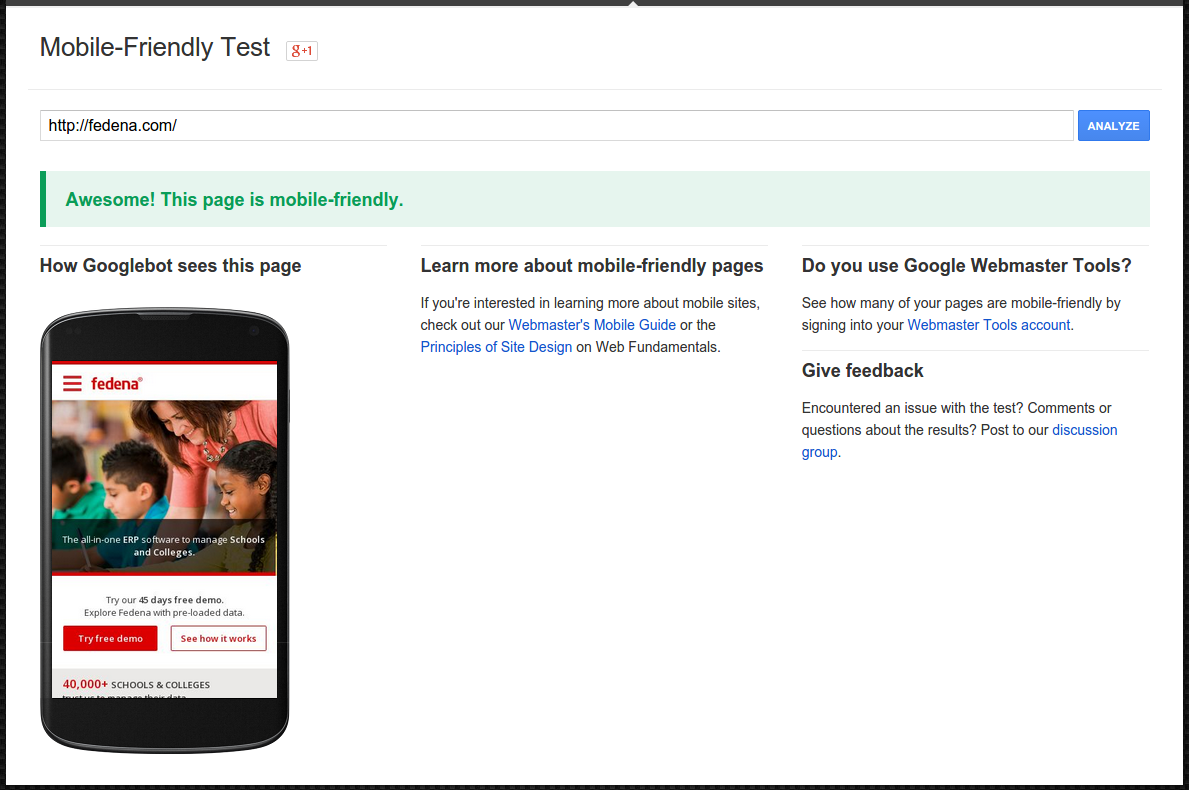
As you can see in the above screenshot, we were successful in making fedena.com, a mobile-friendly site.
This article is written by:


IMG_2811 (1)  Poornima G


A developer by profession and an explorer by nature, she tends to learn new things from every avenue she traverses and finds happiness in implementing them in her endeavors.
Beyond the work-space, she intends to lose herself in sleeping, travelling and reading.

How can you look Forward to a Better GPA

GPA
Clearing all exams with just a passing mark is not enough. One should look forward to a good GPA (Grade Point Average) and make others envy about it. Do not be a kind of student who ignores when his GPA is being asked by other people; instead work hard and make efforts to secure a upright GPA as this will add spark in your resume and achievements.


There a few things which you should look forward for scoring a better and respectable GPA.


Don’t skip classes:


Plan your friends’ hangout and other plans after the class. Don’t skip your classes as this will make you miss your lessons and you will be unable to write down your notes. Also, this will limit your absences and you will not be able to skip the class in case of any emergency. Exceeding the limit will down-level your GPA.


Sleep well and eat well:


Your body and mind need to be good to work and for that you need proper sleep and appropriate meals. Don’t neglect your body by overloading it with junk food. Try to take home-made food to college. Follow a proper sleep routine. Watching movies late night in week days and eating a burger every day is a big no-no.


Write down your notes:


Yes, I know taking notes through camera or writing them on phone or laptop looks cool but it is not practical. Make sure you write down your notes with hands for an easy revision as notes on screen may stress your eyes and brain.


Balance your social and academic life:


Do not be a nerdy or such a book worm that your friends or family are hesitant to meet you. Take breaks often and hangout with people you love. We all know that all work and no play make jack a dull boy. Balance your social life and studies as it won’t harm your GPA; instead you will do good if your mind is refreshed.


Author Bio


Stewart works as a writer for one of the best UK dissertation writing service on internet. Dissertation Globe helps students who are looking for services to write dissertation and do my dissertation for me.

How to Revert an Archived Student

Revert-Archived
In our previous article, we showed you how to archive a student record. We also told you that when a student record is archived, the record moves from the active record list to the former record list. The record is not deleted from Fedena, so you can always find it later using the Advanced Search function. But there are times when you may need to revert an archived student record and make it active because:

  • you graduated a student in Fedena who was not eligible for graduation.
  • you accidentally archived the wrong student.
  • you are admitting a former student to your institution.

Whatever the reasons maybe, you can revert a student record as long as you’ve archived it and not deleted it.

Who can revert an archived student?

Administrators and privileged employees (Manage users, Admission, or Students control privilege must be provided) can revert an archived student.

Procedure

  1. Use Action Search at the top of your dashboard to search for an archived student. Search using the student’s first name, last name, or student admission number. When searching for a student, make sure to click Search students.
    1
  2. Click on the student name. The student’s profile is displayed.Revert an archived or graduated student
  3. In the top right, click the Revert archived student button.
  4. Click OK to confirm.

Does all records and settings get restored?

When an archived student is reverted, all records and settings including the student’s login credentials and batch information are restored except the following:

  • Any placement details that the student was part of
  • Online exam marks entered for the student
  • Hostel room allotment details
  • Transport route allotment details

The Way We Test has Changed

TestTeam (1)
Hello folks,
Greetings!

First of all, let me introduce myself. I’m Gautam, the new Test Lead at Foradian. The intention of this article is to let you all know about the way testing has changed at Foradian over the past few months and the benefits we have derived out of it. This article would be of interest to all those who have got bored of the Conventional Approach to Testing i.e. maintain elaborate test cases, execute them and mark them as “Pass/Fail”, and repeat the test execution over multiple cycles in a monotonous manner! Have you come across testers who would say “Testing is so boring”? If yes, they are right, because the approach they used to test might be boring! Making the testing activity as boring or interesting is completely in tester’s control. Do read on to find out how our Testing Team has benefited by using the Exploratory Testing Approach rather than the Conventional Approach. By the way, it feels glad to inform you that our Test Team has grown in size from 2 to 5!

Here’s the feedback from a couple of our testers!

Sreeshanth, our Senior Tester says:

I was unaware of the Exploratory Testing approach when I began my career. I got a taste of it in July 2014. I learnt that Exploratory Testing  refers to simultaneous test design, test execution and reporting. In this, the tester has complete freedom to test the application of interest. In my opinion, the earlier test approach we followed was more time consuming than the current one. Previously, after completion of the development process, we directly started testing by creating a document, which was also shared with the developers. First we tested in the dev’s local server, and once all issues were fixed, we used to begin testing in the test server.

With the use of Exploratory Testing approach, a lot has changed. When we get a new feature to test, we won’t know much about the behavior. So initially, we go through the SDS and SRS to get a fair idea about the feature. Later we brainstorm using mind maps. I felt mind mapping is the perfect tool to brainstorm test ideas and execute them, gradually evolving our test ideas while testing. This way, testing becomes interesting and empowers the creative side of testing, which feels rewarding too. After this, we create lean test design (Test ideas and scenarios without elaborate steps to be performed) in excel format and share it with the developers. The important thing is, we start the testing process even before the development begins, which is also helpful for developers to understand the feature from an end user’s perspective. After a feature is developed, we execute tests in the test environment and report the results. With this approach, we could test faster and with more creativity.

Ali, another Senior Tester says:

I would consider the change in the test approach a welcome change, when compared to the methods used by my previous employers. From what I understand, the earlier approaches were tedious and time consuming. They sucked the fun out of testing. I believe it is important for the tester to enjoy his testing activities. Conventional test approach limited the exposure to practical scenarios that would be encountered by the user. Since the tests were scripted and static, it also lead to limited expectations.

With the use of ET, we do not document the expected results, because there could be many and it’s up to the tester to identify them while testing. ET provides personal freedom since testing is not defined in advance. I found it to be intellectually stimulating. The use of mind maps enables me to make note of the important areas to be covered during testing. I remember having used it during my early days in Foradian for testing a feature along with Gautam. Exploring one module or scenario opened doors to many other possible scenarios. ET gives better coverage too. It is important to find the critical defects in a timely manner and ET helped in identifying the critical defects very quickly. Usually with ET, there is the risk of not being able to recreate the scenario that led to the issue in the exact manner, but this is taken care by the lean test documentation approach we follow. Mind maps and test reports are maintained for documentation.

Our New Test Approach

Involving the Testing Team in the UX Design phase itself, so that UI/UX bugs could be identified well in advance, rather than during testing. We do the Test Design as soon as the UI prototypes are available, and add more tests during the Exploratory Testing phase.

  • Implementation of the Test Strategy mind map for every feature to be tested, lists the probable areas impacted by the feature. This list actually expands our test ideas to achieve better test coverage. This would also help our developers to know and handle impacted areas across modules.
  • Following the Lean Test Documentation (Flexible excel template for listing only the test ideas and test scenarios, excluding elaborate test steps, and marking the test execution results against them) approach helps us devote less time for Test Design and more time for Exploratory Testing.

Here’s a sample Test Strategy mind map for your reference!

Revert Archived Student. - Test Strategy
To conclude with, we are committed to test your favorite Fedena much better, resulting in minimal bugs which hardly bug you, thereby giving you an enhanced user experience! Team Foradian is thankful to you for your unprecedented support and cooperation.

The article is written by:

GautamGautam M S
“Gautam doesn’t breathe air, he breathes testing instead. He is a disciple of the Context Driven Testing community and testing is his way of living. You can’t convince him without logic! He believes testing is a scientific way of analyzing things at hand!”

ERP in Education: The pros and cons of ERP implementation in education

ERP-Jan29_15 (1)

We live in a world where computers are omnipresent; technology has entirely changed the way we live, towards the better. And education is one such name where technology and the use of computers have changed the way it is delivered, completely different from what it used to be in the last decade. Other than various new learning techniques like online courses, smart classrooms; technology has equally simplified the management of educational institutions.ERP implementation have been revolutionizing institutional management for sometime now, helping institutions to improve their operations, thus making them manageable and more transparent.

ERP in education is not a new concept; ERPs were in full-fledged use in major corporations in some of the biggest industries, to ease the management process. With the development of technology and widespread demand for computing concepts has led to the increasing popularity for ERP solutions in other industries like educational institutes.

ERPs over traditional system of management

So, what gives educational ERP the edge over traditional method of management? Definitely, its the time and efficiency factor that places the software ahead of the traditional methods. Managing funds in an institution and tracking them into a report almost sounds like rocket science if done manually. A lot of productive time goes into meeting this kind of specific requirements. Moreover, management of a lot of basic operations like inventory, HR, finance and other services at times appear a complex task. Educational ERP implementation can ensure an institution function at its maximum potential.

The benefits of an education ERP system


An education ERP definitely has a lot to offer, like-

  • Cost effective: Perhaps the most prominent advantage of using ERP in education is the costing factor. Saving on the amount of man hours let you save so much on finance. Basic campus management requires a lot of manpower to manage things like fee collection, the grueling admission process, etc. When this management is done online, a lot is saved on the finance sector which can be used in other useful purposes.
  • Better organization of data: Organize your data the way you want. Education ERP gives you a lot of ways to organize data of your institution that would help in proper management of it. Data is managed well and available with a single click of a mouse.
  • Data is secured: Data or information stored in web servers are far more secured that those stored physically in shelves. Storing information and data stored by ERP software in servers have backup systems and thus, your information is preserved! Is it possible with physical storing of data and files?
  • More automated administration: The entire administration which was otherwise managed using huge manpower, involving all possible flaws that are not tracked easily and managed. With education ERP, the point of flaws in managing important administration processes like fee collection, library books, admission list, etc is nearly minimal, unless there are some human errors in filling up information or technical glitches.
  • A quicker management process: Education ERP software quickens the entire process of institutional management to great extent, lets say in a matter of seconds. All you need to wait for is the implementation of the ERP software and you are set for a faster management of your institution like never before. Be it the admission process of an entire new batch of students or generating customized reports on a particular batch is a task done in minutes.
  • More focus on education: When most of the time is saved from taking one-to-one attendance in class or filling up the mark sheet after every exam, a lot of time is saved to be invested in what is more important- teaching!

The limitations of an education ERP

Of course, there is other side of the coin too! Even if the management of your institution is available within the single click of a mouse, there are some limitations that prevents institutions to choose education ERP solutions for better management. Some of them being,

  • One failure of ERP in education can be measured in terms of achievement of Return on Investment (ROI). When the ERP implementation doesn’t yield enough ROI, it can be a failure.
  • The cost of ERP, its planning and implementation, customization, configuration, etc might be too much for lesser profit-driven schools.
  • Most ERPs are difficult to learn and use. With complicated user interface that requires thorough user training, it requires complete participation of users.

Time has come for all educational institutions to go the smarter way. Re-organize the management systems of your institutions to match the evolving technology in every aspect of life.

Tracking Student Attendance just got Easier

Fedena-Blog---DailyAttendance_b
Tracking student attendance for your institution is very important. It helps you evaluate its quality, make timely administrative and financial decisions, and plan events such as fire drills and other institutional activities. Being aware of student attendance is not only important for your institution but also for your students. Regular attendance is important to a student’s academic success. Knowing your student attendance will help identify absence trends and give the institution the necessary data to establish an action plan to change the attendance culture of an individual student or a group of students. To help you with all this, we’ve introduced the Day-wise Attendance Report as part of Fedena 3.4. On any given day, you can now easily track the overall student attendance of your institution, as well as for each batch.

Who can access the report?

Only Fedena administrators and privileged employees (either the Student Attendance Register privilege or the Student Attendance View privilege must be provided) can view the Day-wise Attendance Report.

How to access the report?

After you log in to Fedena, go to the Attendance module.
1

Remember, this report is available only if you mark student attendance Daily.

What does the report show you?

The Day-wise Attendance Report displays the number of students present in your institution, as well as the number of students absent in each batch on a particular day.
Generate the student day-wise attendance report

To view the student attendance count for a previous date, all you need to do is change the date. The Overall Strength in the top right is the total number of students present in your institution for the selected date.

Use the Select a course field to view the number of students absent in each batch of a particular course. You can then click on a batch to view the names of absent students.

Generate the student day-wise attendance report1

To generate a CSV report of the number of students absent in each batch, click the CSV report button.

5 Most Common Myths About Virtual Learning

5-myths

As computers become more commonplace, they are revolutionizing almost every aspect of human life. One aspect of life which computers are impacting is the way people learn. The penetration of computers into the learning sphere has led to a rise in something called “virtual learning”.


Virtual learning is basically the use of computers to deliver instruction to learners or students. Unlike traditional learning which involves physical interaction between students and teachers, virtual learning doesn’t involve physical instruction. It uses computer software or an internet connection to facilitate the interaction.


This type of learning can take the form of computer-based learning (where a student receives instruction from a computer installed software). It can involve remote online learning (where a student receives instruction from a teacher via the internet). It also involves interactions between learners through online communication platforms as they share experiences and collaborate on learning projects. Virtual learning is also referred to as digital learning or “e-learning”.


As virtual learning becomes increasingly popular, so do myths about it. Some of these myths are simple misperceptions. Debunking them is essential to enjoy the full benefits of virtual learning. Some of these common myths are the following:


Myth #1: Virtual Learning Primarily Involves Spending Time At A Computer


The fact that learning takes place through the computer doesn’t mean that students will necessarily spend all their time at a computer. Depending on the subject of the study, students can carry out activities like library research, drawing, lab experiments, social interactions and collaborative projects. Some virtual schools even organize periodic school trips for learning purposes.


The bottom line is that despite the fact that virtual learning mostly takes place through computers, it is not the only format through which actual learning can occur.


Myth #2: Virtual Learning Is Fundamentally Teacher-Less


The idea here is that virtual learning eliminates the need for teachers. This is a misconception for two reasons. First of all, virtual curricula are typically developed or adapted by certified teachers. As such, even automated learning software involve an input from teachers at a certain point.


Secondly, there are situations in which the physical presence of a teacher figure is inevitable. This is true, especially where young children are involved. They may need someone to offer guidance, demonstrations and supervision. This someone may be termed a Learning Coach or may even be a parent. However, the role they will play is that of a teacher. Therefore, claiming that virtual learning eliminates the need for physical teachers is quite erroneous.


Myth #3: Virtual Learning Is All About Technology


Most people imagine that virtual learning succeeds or fails on technology. The assumption is that once you have the right technology in place, everything will work out perfectly. This couldn’t be further from the truth.


The fact is that technology is simply a conduit for learning. The most important aspect is the curriculum or material which is being learned. As such, the main focus should be in finding the best way of passing the material in a manner which is fun, effective and understandable for the learner. Unless this is considered, all the technology in the world will not make people better learners.


Myth #4: Virtual Learning Limits Social Interaction


Social interaction has always been a key component of the learning process. In the traditional classroom setting, interaction is guaranteed by the proximity that students have to each other. In a virtual learning environment, such proximity isn’t obvious. As such, there is a common assumption that social interaction tends to be limited for students who learn virtually. This isn’t at all true. In a virtual environment, social interaction occurs via IM, email, Skype and social media platforms. Besides that, there are opportunities which are created for face-to-face interactions between students and teachers. For instance, some virtual schools organize school trips, as well as collaborative programs in which students can meet and share their experiences.


Myth #5: Virtual Learning Is Best Suited For The Homeschooled


Virtual learning has always been considered something of an alternative for standard traditional learning. As such, most virtual schools tend to focus on recruiting those who are homeschooled. In doing this, they end up missing an opportunity of recruiting students who haven’t been home schooled.


The simple fact is that almost anyone can benefit from a virtual learning program. Those who are home schooled may be more likely to sign up for these programs. However, even non-homeschooled students can benefit from it. This is the reason why many educational institutions provide virtual learning programs for their students – even those who attend traditional classrooms.


In a nutshell, these are the 5 most common myths about virtual learning. These myths can form perceptual blockages which can limit the potential benefits of this type of learning. As such, debunking them is a critical step towards unleashing the full potential of this new type of learning.

Take Control Over Your Sales

Take-control-over-sales (1)
For institutions who constantly purchase and sell items, managing inventory can be just as crucial as managing finance. And if you thought tracking all your institution purchases were hard, tracking outgoing items and their invoicing can be even harder.

Introducing ‘Sales in Inventory’, a feature part of the Inventory plugin that enables institutions to easily record and track items they sell. From student uniforms to textbooks to sports equipment, now sell any item and let Fedena do the rest of the work. And what good would it be to make all those sales and not know the status and value of the items sold. Fedena generates comprehensive sales reports that help you keep track of your store sales, the availability of items, and the amount collected for each item.

Workflow to set up and to track items sold
Flowchart

Who can manage items for sale

Fedena administrators have complete privileges over the ‘Sales in Inventory’ feature. Administrators can set up items for sale, create sales invoices, as well as generate sales reports. Fedena offers the following inventory privileges that can be assigned to employees.

Privilege Control
Employee Manager Inventory Setup items for sale and generate sales reports.
Manage Inventory Control the complete Inventory module, which includes all activities connected with ‘Sales in Inventory’.
Inventory Basics Set up items for sale.
Inventory Sales Create sales invoices and generate sales reports.

Step 1 – Create an item category

The first step would be to create the item categories under with each item can be recorded and sold.

  1. At the top of your dashboard, click the module access icon > Administration > Inventory > Item Category to open the Item Category page.
    1
  2. Enter the name and category code, and then click the Save button.

Step 2 – Record a sellable store item

  1. At the top of your dashboard, click the module access icon > Administration > Inventory > Store Items to open the Store Items page.
  2. In the top right, click the New button.
    2
  3. Enter the item details.
  4. Select the Sellable checkbox.
  5. Select an item category.
  6. Click the Save button.

Step 3 – Advertise and sell the item

Now that you’ve recorded the items to be sold, how do you let everyone know that a sale is on? The answer is right in front of you – Fedena. You can use Fedena to seamlessly communicate to your students, parents, and employees. Some of the best ways would be to:

  • Use the News module to announce to the whole institution that a sale is on.
  • Use the SMS or Email module to send a message.
  • SMS and Email settings not configured? Not to worry. Use Fedena’s internal messaging system to send out a quick note.
  • Already have discussion groups setup in Fedena? Use the Discussion module to share the message.

Step 4 – Create a sales invoice for the items sold

Complete your sale by creating a sales invoice and issuing a copy to your customer.

  1. At the top of your dashboard, click the module access icon > Administration > Inventory > Billing to open the Invoice page.
  2. In the top right, click the New button.
    3
  3. In the Store field, select the store to which the item belongs.
  4. In the Issued to field, enter the Fedena user ID to search and select the user. The Name field and Address field automatically populates the user information.
    Note: If the customer is not a Fedena user, you can manually enter the customer’s name and address.
  5. Enter the billing details. You can search for the item using the item code or item name. If required, you can create an invoice for more than one item clicking Add New Item.
  6. In the Tax (%) field, enter the item(s) tax.
    4
  7. Enter any additional charges or discounts applicable. The Total is the amount to be paid by the customer.
  8. Select the Is Paid checkbox if the item is paid for.
    Note: You can create an invoice even if the item(s) is not paid for. When you later receive the payment, you can edit the invoice, select the Is Paid checkbox, and then save the invoice.
  9. Click the Save button to create the invoice.
    5
  10. Click Print to print the invoice.

You can always print the invoice at a later time as well. Go the Invoice page (module access icon > Administration > Inventory > Billing), and then search and select the invoice to print.

Step 5 – Generate sales reports

Use the following reports to know how your sales team has performed:

  • Item-wise Report
  • Day-wise report
  • Invoice Report

Item-wise Report

Use the Item-wise Report to view the availability of items and the amount collected for each item.

At the top of your dashboard, click the module access icon > Administration > Inventory > Reports > Sales Reports > Item-wise Report.

6

Day-wise Report

Use the Day-wise Report to view the amount collected and the total number of sales made by each store on the specified date(s).

At the top of your dashboard, click the module access icon > Administration > Inventory > Reports > Sales Report > Day-wise Reports.

7

Invoice Report

Use the Invoice Report to view the list of invoices together with their details for the specified date(s).

At the top of your dashboard, click the module access icon > Administration > Inventory > Reports > Sales Report > Invoice Reports.
8

You can also click on an invoice number to view the complete invoice details.

So there it is, use Fedena to record and track the items your institution sells and ensure proper financial management and accurate reporting.

The Smart Glasses the Education World Was Waiting for

Smart-Glasses

Google has introduced a new set of eyewear- a mass-market ubiquitous computer known as Google Glass. And no, this isn’t just any pair of cool-looking sunglasses a cool-looking actor can wear and make millions in sales from. It’s real. A computer disguised as an ordinary-looking pair of glasses. Well, sort of ordinary.

Awesome! So What Are the Features?

Google Glass features a sophisticated display with the help of lights, LED, and all sorts of reflection techniques (and of course plenty of sophisticated science) to display a screen-like image in front of the user’s eye. It also includes a touch-pad on the side of the glasses for physical navigation. A voice command is another option if the user’s hands are too busy or wearing any sort of fabric which doesn’t allow touch-control (gloves, mittens, etc). One of the most useful and coolest features is that of the 720p HD camera. Sure enough, this gives all Glass users the ability to capture images and record videos of high quality.

“Ok, Glass, tell me how you can make me a better student?”

Glass won’t answer that for you, but I can. With the help of several applications, Google Glass can make education and studying in the classroom easier. Other than Google’s own free and inbuilt applications such as Google Hangouts, Google Now, Google Plus, and Google Maps, third party developers pitched in to innovate new apps for Google Glass that further enhances its capabilities. How?

  • University Professors, with the help of video recording applications can capture videos during their lesson. Now, the students won’t only have PowerPoint material and textbooks as notes, they can view a video of the lesson from the teacher’s point of view. That way, they haven’t missed out a thing in the lecture!
  • Professors can open a Google Hangout conversation during the lecture and ask students who are shy or unwilling to disturb the class to send their questions in the form of a message right away. The Prof. can answer when the time is right and the method will persuade students to be better participants without any reluctance.
  • Locating the university if you are a new student in a completely foreign country won’t be problem anymore. Google Map through Glass while you’re riding your bicycle will help you reach your university campus on time.
  • During class, sending a note to a friend or asking, “Dude, what’s he sayin’?” won’t be easy, but an IM through Glass will allow the communication without a peep.
  • Forget about taking notes on your notepad now. The Evernote App will allow you to take notes easily during the lecture in your own words. Recording a video of the lecture will certainly help to remind you what you learned in the lecture you attended two months ago.
  • Word Lens is the latest translator app introduced in Nov, 2013. Foreign students, this is certainly good news for you! Translate your instructor’s foreign language to better understand the lectures pronto!
  • Extra classroom content can be viewed during the lecture.
  • A recent application developed by a student called Speech Helper allows you to send text documents and PowerPoint presentations to Glass. This will enable professors as well as students while presenting to read notes and help delivering their speech, presentation, debate, etc.
  • Teachers who are checking and marking assignment, exams, or reports can, after checking and grading the work, record a video of their feedback. They can provide detailed explanations of why their questions were wrong and how to improve them in future.
  • News alerts from CNN or The New York Times will keep students updated with current affairs and be able to participate better in class with the latest information.

The article is written by:

Anais John. She is a career consultant who loves to share her expertise on leadership program, career path. Presently, she’s working for an online service that helps learners who come their way asking, “can you help me do my essay?”

Archiving or Deleting a User Record

Archive
The difference between archiving and deleting an employee or student record is – when you archive an employee or student record, the record moves from the active record list to the former record list. It does not delete the record from Fedena, so you can always find them later using the Advanced Search function. When you delete an employee or student record, all data associated with the record is removed. You cannot restore deleted records.

Who can archive and delete?

Only Fedena administrators and privileged employees can archive and delete employee and student records. For a privileged employee to be able to archive or delete employee records, either Manage Users or HR Basics privilege must be provided. Similarly, to be able to archive or delete student records, either Manage Users, or Admission, or Students Control privilege must be provided.

Archive or delete an employee record

When archiving or deleting an employee record, the following two options are available:

  • Employee leaving the institution – Use this option to archive and move the employee from the active employee list to the archived/former employee list.
  • Remove employee records – Use this option to delete all information associated with the employee. Once deleted, the employee record cannot be restored.

Note: You cannot delete an employee record that has dependencies—such as, subject association, part of a discussion group, and so on—in other Fedena modules. Unless the dependencies are removed, you cannot delete the employee record.

  1. Go to the employee’s profile. You can find the employee using the search bar at the top of your dashboard, or through the Manage Users page (Module access icon > Administration > User).
  2. When you find the employee, click on the employee’s name to view the employee’s complete profile.
  3. In the top right, click the Delete
1

The Remove employee page is displayed.
2

  1. If you want to archive the employee record, select the Employee leaving the institution You must specify the reason for the employee leaving, and then click the Delete button.
    3

If you want to permanently delete the employee record, select the Remove employee records option. A confirmation message is displayed. Click OK to confirm removal.

Archive or delete a student record

When archiving or deleting a student record, the following two options are available:

  • Student leaving institution – Use this option to archive and move the student from the active student list to the archived/former student list.
  • Remove student records – Use this option to delete all information associated with the student. Once deleted, the student record cannot be restored.

Note: Unlike employees, student records can be deleted even if the student has dependencies in other Fedena modules.

  1. Go to the student’s profile. You can find the student using the search bar at the top of your dashboard, or through the Manage Users page (Module access icon > Administration > User).
  2. When you find the student, click on the student’s name to view the student’s complete profile.
  3. In the top right, click the Delete
    4

The Remove student page is displayed.
5

  1. If you want to archive the student record, select the Student leaving institution You must specify the reason for the student leaving and the leaving date, and then click the Delete button. 6

If you want to delete the student record, select the Remove student records option. A confirmation message is displayed. Click OK to confirm removal.

If the student has dependencies in other Fedena modules, a warning message similar to the image below is displayed.
7

If you still want to delete the student record, click the link.

Now that the student record is archived or deleted, you may be wondering what happens to the associated parent record. So here’s what happens:

  • If a student record is archived, the parent record is no more active. However, if the archived student is a sibling, the parent record will remain active.
  • If a student record is deleted, the parent record is also deleted. However, if the deleted student is a sibling, the parent record will not be deleted.

There are many reasons why an institution would want to archive an employee or student record in Fedena. It could be because the employee no longer works at the institution, or the student has moved to another school, but you want to keep their information in Fedena so you can access it at any time. Similarly, there are many reasons why an institution would want to delete an employee or student record permanently. It could be because a duplicate employee or student record was created, or a factitious record was created when learning Fedena, or a record was created accidentally or with incorrect information.

Whatever the reasons may be, Fedena offers the flexibility either to archive the records or to delete the records permanently.

Celebrate this Christmas with the all new Fedena 3.4

Fedena 3.4 for Blog

It’s almost Christmas, and we are pleased to present Fedena 3.4, which delivers improved performance and provides further flexibility. We have been listening to your feedback, and this release offers many exciting new features and enhancements, and also includes a significant number of key fixes to Fedena.

To highlight some of the new and enhanced features:

  • Revert an archived or graduated student with all associated settings in just a single click.
  • Customize the type of hostel or transport information to be recorded based on your institution’s requirements.
  • Optimized, interactive dashlets that take you right to the information you are looking for.
    New Dashboard (1)
  • A report to easily track the overall student attendance in your institution, as well as for each batch.
    2
  • Assign various finance privileges to help define employee roles and responsibilities while ensuring security.
    3
  • Create fee payment transactions for any custom date.
    4
  • Calculate students’ CGPA either By GPA Average or By Credit Hours.
    5
  • Various enhancements to the Timetable module making it easier to create and manage clear and error free timetables.
  • Fedena supports over 20 languages, and now you can add Dutch to the list.

The Foradian elves have been working hard over the past couple of months to advance Fedena and to create an amazing experience for our users. We are excited and are looking forward to you getting your eyes on this major release. We will continue to work hard on addressing more of your feedback as well as introducing new features to make your Fedena experience even better.

We’re eager to hear from you! Write to us at info@fedena.com and let us know your thoughts, questions, and feedback.

We hope you all enjoy a wonderful holiday season, and we’ll see you in 2015 with more great releases.