Managing a group of people for a project is not an easy task to do. Especially when the group of people are students and they have to have good communication and collaboration among themselves to carry out the project properly. Using a software or tool is a smart idea. But students won’t be comfortable with using a tool that’s beyond the reach of their pocket. There are some names that can be good task management tools along with keeping the pricing factor favorable to students as well. Read below to know more.

Redbooth : A good and pretty easy-to-use software for students who are looking forward to manage their projects, Redbooth is a platform for communication and collaboration with instant messaging and video-chat for a swifter communication among project team members. Moreover, the well-organized file-management offer with a centralized file location and integrations are add-on benefits. Redbooth also offer mobile tools to get access to files and projects anytime and offers a Free Plan with 5GB storage and 5 users.

Slack : Another very interesting software for students involved in group projects is Slack which comprises of 3 main features- direct messages, channels defined with a hashtag and private groups. Plus, various other features like Google Drive integration, Dropbox, file sharing, open groups make it a popular software for students for better management of projects. Really easy-to-use, one can just start with the software instantly without spending much time in the learning process.

Teamwork : Collaborate and share among project team members with much ease using Teamwork that allows a lot of integration tools like Google Drive for easy storing and sharing of documents and any information. Besides, the central file management system let students to upload and store documents within the personal account. One striking feature of this software for students for project management is that the pricing is based on the storage space opted and the number of projects.

Basecamp : One of the prime factor that makes Basecamp a good option as a software for students dealing with a project in a team is its Progress window that allows to track the works that’s already done. A very nicely documented team management app, Basecamp lets you restore anything that you accidentally delete from the software.

Glasscubes : Any project team with members of five or less, Glasscubes is one of the best options at hand. Options of unlimited projects and a storage of 1GB, this software for students looking forward to project management allows to take part to discussions and create new tasks without even logging to the system. There is a whiteboard feature that lets any member of the project group to add or edit any added document in the system.
7 Important Reasons for ERP Implementation Failure in your Institution
Why do ERP implementation fail? There can be several instances where one educational institution have made the most out of an ERP software; whereas, the same software have not yielded desired results in another institution. So, what can be the possible reasons? Let’s find out:
-
- No clear objectives: A very common mistake most of the institutions looking out for ERP implementation is the lack of a clear goal. Without a clear and sure definition of the expected success, the problems to be targeted, financial benefits expected, the end result will be vague. This include the very first important stage of taking the decision to go for erp implementation as well. The dilemma of whether you need an erp for your institution should be solved in the first place.
-
- Lack of proper user-training: The process of ERP implementation shouldn’t be done in a hurry, more specifically the training part. Since the erp system offers complete automation of most of the departments functioning in your institution, the training has to be apt, to the depth, for the right amount of time and should include all possible users in the institution. Without proper knowledge of the implementation by the end users, optimal usage of the system falls short off.
-
- ERP implementation is not a cost. It’s an investment: Most educational institutions fail to realize that ERP implementation is an investment that’ll yield profit in the long run. In turn, they look out for vendors who offer the lowest quote, thus overlooking the expected benefits or results.
-
- Change management: A very common reason for ERP implementation failure is the inability to manage the change that’s coming up with the new implementation. Adapting to the change the system brings about is a smart move rather than pointing out the difference between the old system and the new one. The point that the decision of upgradation of the system is opted by you, itself speaks how important it is to you to adapt to the change for optimal result.
-
- Poor overall management of the project: Managing an ERP implementation project in your institution is not an easy task. A good management team or a leader is needed, who can look over the entire implementation process- scheduling things, proper communication between all the right people, etc is .
-
- Absence of data accuracy: If proper and accurate data is not transferred to the new ERP system implemented in your institution, the system would lose its credibility with the end-users.
- Overlooking technical difficulties: Hardware difficulties, interface problems with the management process in the institution, ‘bugs’ in the software can lead to a bad experience with ERP implementation.
ERP implementation is a long term process; hence, the steps you adopt towards implementation should be executed correctly. These problems, if timely dealt with, can never get you the undesired experience of an erp implementation failure.
8 Tips to Teach Effectively in Class
What makes a great teacher? Well, there are no hard and fast rules to make a great teacher and different approach towards teaching works for different people. Some teachers are in favor of showering praise to students to motivate them to work harder; while some considers praise to be causing harm to a child’s learning process. Telling your students what to do does not alone, means teaching. It’s more than that! Today, we bring to you some ideas that might assist you in your effort to make your teaching more effective in the classroom.
It’s all about passion!
What differentiates a good teacher from a great one is the passion for teaching. And the passion has to be genuine. Faking the passion would lead to nowhere. It is believed that students can get along easily with a teacher they think care about what they are teaching.
Know your students well; just like you know your subject.
Knowing your subject isn’t enough to make you a great teacher. Know the people you are teaching- what all they like in what you teach, their requirements and what they need to learn from you. Teachers should not get lost in the very important step towards effective teaching, i.e. know your students well.
Create a safe and better learning environment for your students.
Promising a secure environment for your students is important, to let them acknowledge what they don’t know and allow them to learn things. You, as a teacher, can create a safe and secure environment which will allow your students to take the risk to learn. Simple things like decorating classroom walls with students’ works can develop the faith in students for their teacher.
A good teacher-student relationship is crucial.
A very obvious step to follow. Make all effort to build up a strong relation with your students and it definitely has a lot to affect learning in classroom. Good environment in classroom with a thriving teacher-student relationship is a sign of a progressive classroom.
Keep your teaching CLEAR.
A great teacher can also be categorized as the one who has the ability to simplify complex learning into something that’s easily graspable to students. The biggest problem with most teachers is that they fail to realize if students understand them or not. Keeping the learning method simple and clear is important.
Be an amazing behavior manager.
Good knowledge about your subject and how you deliver it in class alone doesn’t make you a great teacher. Managing classroom behavior includes managing students behavior in the class, proper usage of lesson time and optimal management of learning resources. All these points are as important as your knowledge in the subject you teach.
A good teacher-parent and teacher-colleague relationship is also important.
Just as you need a good relationship between you and your students to build up, an equally good relationship is required on the professional front too. Timely communication with parents, being supportive to colleagues equally affect student learning. How? Good relation with colleagues can open up new teaching methods. Whilst, communicating with parents is highly important for a student’s overall development.
Be open to new learning styles.
A lot of teachers have the opinion that each student is comfortable with their own style of learning and it’s always better to encourage them to learn in their preferred style. Moreover, being a teacher, you have to keep updated about the latest teaching styles that can optimize the learning process.
The Right ERP Software Selection Guide for Your Institution
Complete automation of management processes in an educational institution is needed. Why? To keep up with the fast evolving technologies affecting every aspect of our life, including education; why should school management take the back seat. Implementation of ERP software is a smart choice.
Selecting an ERP software selection is not an easy task and the process should be dealt with much care. Researches have proved that the main reason of failure of ERP software implementation is the disparity between the software and the needs and requirements of the institution. Hence, in order to help you avoid such circumstances, we get you some tips and suggestions that can guide you towards the right selection process of an ERP software for your institution.
Create the objectives. Why do you need an ERP software system for your institution? What you need to do in the very first place is to clear out the objectives and vision behind the ERP implementation. Set up a team of teachers and administrators who can review strategies according to the existing processes running in the institution and which require automation. Once the objectives are clear, rest of the processes will be easy and smooth.
Create the feature list for ERP software that you need for your institution. The researching team have another task to carry out- figure out the features of an ERP software in accordance to the requirements of your institution. Knowing the features clearly will help in choosing the right ERP software.
The ERP software list is highly important. See who all are the players in the market. Shortlist the ERP software providers, based on the kind of requirements you have. A smart way to shortlist providers can be through conversation with other existing ERP user institutions. They can help you out with their experience of ERP providers in the market. Based on the available info, you can shortlist and have a talk to each of the ERP software provider to go into details of the strength and weaknesses of each of them.
The next very important step is to prepare the request for proposal. Request for proposal is necessary for it helps you with selection of the final list of ERP software suppliers. Consider the weakness and strengths of each of them and seek additional information if there are areas of doubt anywhere. Based on your review, make the finalists to whom you can propose for a demonstration, to get a clear picture of how each of the ERP software functions.
Price is an important factor in the selection process. Yes, you cannot just ignore the pocket when you are deciding on an ERP software system. But it shouldn’t under-emphasize other critical factors of selection for sure, like implementation procedure, after-sale support,adaptability, flexibility to mold according to the needs of your institution as well as the ROI (return on investment) factor among others.
Do a value check of your investment. Based on the possible benefits and disadvantages that comes along with the ERP software you selected, comparing them with the cost you spend will give you a clear idea about your investment. An analysis of the benefits that awaits you including an increase in productivity in terms of management in reduced cost, better control of data in a safe and secure environment and all those important benefits for a real value check of your investment.
When you examine the ERP software options available in the market, it’s common that almost 80% of the offerings by the softwares are same; but it’s the remaining 20% that makes the real difference- the tailored-made offers according to individual requirements.If you wonder what all features of an ERP software should be considered, read through an interesting article here.
All you need to know about barcode integration with Fedena

Lately, the Fedena Support team has been receiving quite a lot of questions about barcode integration with Fedena and how it can be used to manage a library. In this article, we’ll try to address all the questions briefly.
What are barcodes?
A barcode is a way to encode information about an item in a visual pattern that an optical scanning machine can read. There are two types of barcodes – linear and 2D. A linear barcode is made up of black and white bars of various widths that create specific patterns. A linear barcode is the more commonly used on books.

A 2D barcode is more complex and can hold more information about an item. A QR code (Quick Response Code) is a common example.
What are barcode readers?
A barcode reader is a device that reads barcodes and outputs the details of the item on a computer. A perfect example of a barcode reader is the one you see at your favorite retail store that reads and logs the price of an item.
Is Fedena integrated with barcode technology?
Yes, Fedena is integrated with barcode technology to help you efficiently manage your library.
Does that mean Fedena can generate barcodes?
No, Fedena cannot generate barcodes for you. Fedena only enables barcodes read by a barcode reader to be filled in the system automatically.
Is there any setup that I need to perform in Fedena?
No, there is absolutely no setup you need to do. All you will need is Fedena with the Library plugin and a barcode reader.
What type of barcode code readers can be used with Fedena?
Regular barcode readers with USB or Bluetooth support can be used with Fedena. However, make sure that the device can read linear barcodes.
How does a barcode reader work with Fedena?
With Fedena, a barcode reader can be used when:
- Adding a new book
- Checking availability of a book
- Issuing a book
- Returning a book
Here’s how it works. Let’s say you want to add a new book to your Fedena system. Here’s what you got to do.
- Go to the Manage Books page (Module access icon > Academics > Library > Manage Books) in Fedena.
- In the top right, click the Add books button to open the Add book page.
- Select By barcode as the book addition mode.
- Position the cursor in the Barcode field.
- Scan the barcode on the book using the barcode reader. The book’s barcode number is automatically filled in the Barcode field. Make sure the barcode reader is plugged into your computer.
- Continue entering other required information and save.Here’s a GIF file showing you how it’s done.
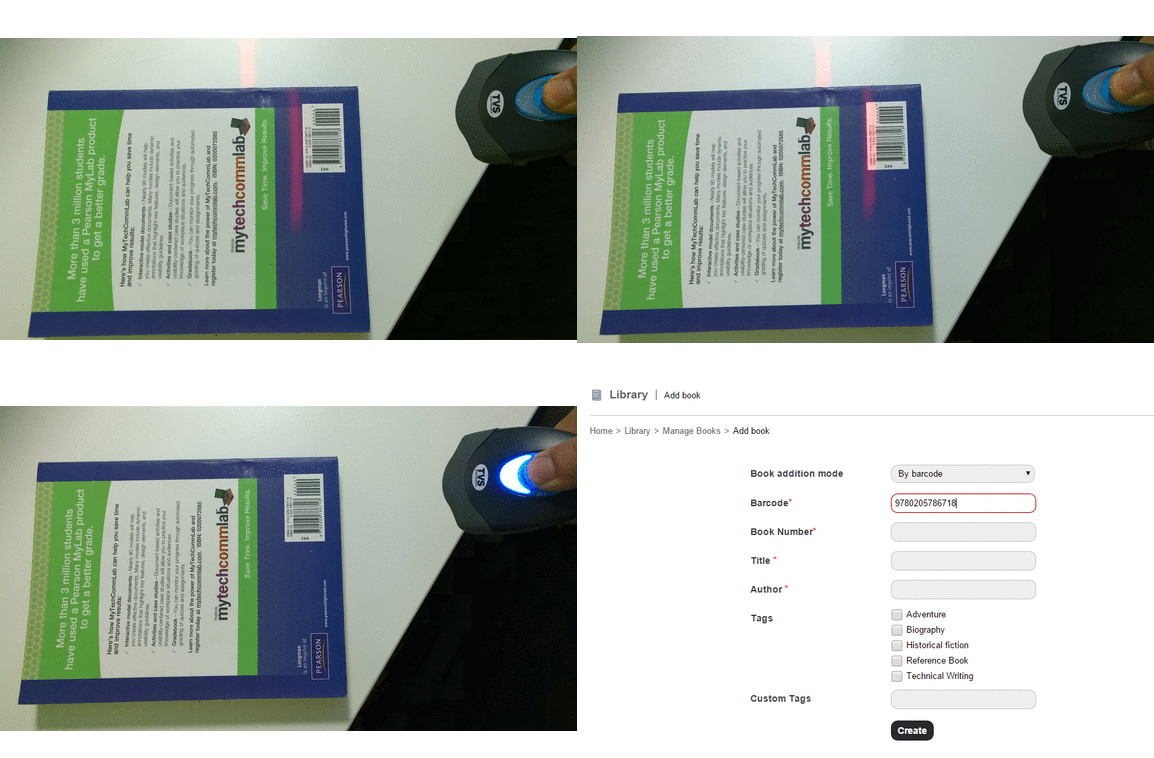
The barcode reader used the above illustration is a plug (USB) and play reader manufactured by TVS Electronics, Model: BS-C 101 STAR
What are the benefits of using a barcode reader in my library?
A few key benefits of using a barcode reader in your library are:
- Reduced staff workload
- Increased accuracy
- Faster check-in and check-out
- Time saving
- Easy stock verification
- Reduced operational costs
- Improved operational efficiency
Do you sell barcode readers along with Fedena?
No, we currently sell Fedena only.
How do I make my Librarian happy?
Get her a barcode reader!
10 Online Tools to Engage Students in Studying Process
When a teacher manages to engage his students in the learning process through interactive techniques, they are able to increase their focus and improve their critical thinking skills. Active participation is important for students to gain meaningful learning experiences in the classroom.
How do you motivate your students to get engaged, when most of them don’t give you a chance to show how fun learning can be? The following online tools will support you on that mission!
How-To-Study.com
This website will be a faithful companion throughout your growth as an educator. It offers effective study tips and articles that help students improve their learning skills. In addition, you will find a separate section for teachers, which offers over 200 free tips provided by experienced educators. New content is being added on regular basis, so make sure to stay updated with the trends.
The teaching resources are separated in the following categories: Reference Sources, Classroom Management, Teaching Techniques, Subject Areas, Language Arts, Math, and Other Teaching Tips. When you start exploring the content at this website, you’ll realize that your potential as a teacher is directly related to the engagement of your students.
ExamTime
Teachers have a great responsibility to provide proper support during exam sessions. You cannot expect for your students to study effectively if you solely provide the textbooks and leave them on their own. Luckily, those teaching strategies are outdated.
ExamTime is a tool you can recommend to your students. It transforms their learning potential by enabling them to organize the studying process and focus on the most important aspects of the material. The free learning platform provides all tools that students need for successful learning.
4Tests
How can you make tests less scary? By enabling your students to practice as much as possible. You don’t have to give tests each day until you make them feel more comfortable with the challenge; that would only increase the stress levels in the classroom.
At 4Tests.com, your students can take free practice exams with no pressure. You won’t be aware of the results they achieve, so they will be intrigued to test their knowledge and see how well they would do on an actual test.
Novel Guide
If you don’t have time to write novel guides for your students, you will definitely appreciate this website, which offer materials on most literature pieces you cover in class. In addition to a plot summary, the website offers discussion and questions for each piece of literature.
When your students rely on these resources, they won’t neglect the actual novels. On the contrary; they will get proper guidance on how to read and understand the author.
Essay Mama
The essay writing assignments are among the most challenging projects your students face throughout their learning adventure. No matter how hard you try to engage them in the process of academic writing, it’s hard to make all topics attractive. Essay Mama is a website that offers professional assistance on all types of assignments. Your students can collaborate with expert PhD authors, who will guide them through the essay writing stages.
The blog section is just as useful for you as it is for your students. It offers a detailed glossary of essay writing terms, as well as a free academic writing guide. In addition, you can read great articles related to education.
myHomework
Your students love using their smartphones and tablets, so you should definitely instruct them to install this cross-platform student planner. The paper planner is not as effective as it used to be. With this app, your students won’t need to worry about forgetting the planner or carrying it around everywhere they go.
The app makes tracking school work as easy as it gets. Thanks to myHomework, they will never forget an assignment again.
StudyBlue
Most conventional learning strategies are outdated for today’s educational system, but that’s not the case with flashcards, review sheets and quizzes. These tools are still effective when it comes to getting the students engaged in the learning process. The free platform offers the largest library of online study materials generated by users.
Your students can find resources on any topic and save a lot of time when they are trying to learn new things.
Fun Brain
What could possibly inspire your students more than properly-chosen educational games? At this website, you will find great games for different ages. The reading section contains books and comics that will bring literature closer to the understanding of young learners. The fun math games will make even the scariest subject more approachable.
ACCA Student Blog
Unfortunately, you don’t have much time for motivational speeches when you have tons of coursework material to cover in class. That’s why the ACCA blog can help! Recommend this website when you notice that some of your students have lost their passion for learning. The motivational resources will help them achieve their full potential, find the right learning methods, surpass different obstacles, and deal with exam failure.
Study Guides and Strategies
“Study is like the heaven’s glorious sun.” This Shakespeare quote is the motto of the website, which offers useful study guides, project management and problem solving strategies, teamwork tips, thinking/memorizing guidance, research and reading tips, and much more.
The guides for learning and studying are very effective for students at different age levels. They will find tips on active learning as an experiential, engaging, and mindful way of processing information.
5 Good Practices for Successful ERP Implementation in Educational Institution
ERP implementation is now a crucial part of effective management of educational institution. All concerns right from the management of finance to attendance to exam to publish of results, can be a lot easier with the adoption of right ERP software. The education environment is changing; at a faster pace; new and advanced methods of learning have replaced the traditional forms. To keep up with the changing face of education, institutions have to be smart with the management part as well.
Opting for ERP implementation is a major undertaking and it just not ends with purchasing of the ERP software. Choosing the right ERP solution to planning and execution- everything has to be in the right place for a rewarding experience at the end. A well designed ERP implementation plan is the key. Here are the best practices:
Review the pre-installation scenarios. Do you at all need an ERP for your school?
ERP implementation should not be a decision in haste. Make sure you have enough knowledge about the benefits you’re going to get with an ERP implementation in your educational institution. It’s advisable to create a team with some teachers and non-teaching administrators who’ll be the end -users, to develop the objectives and chart out the entire plan. A complete analysis of the processes to be automated, the scope of implementation and well-defined objectives will surely pave way for a smooth implementation process.
What are your requirements? Choose an ERP software accordingly.
The functions of an ERP software is extensive; and there are a various types of ERP softwares available in the market. Before deciding on any ERP software, dedicate some days in intensive research of the various softwares available and match them with your requirements. Perhaps, the greatest reason for failure of ERP implementation is disparity between the capabilities of an ERP software and the institution’s processes and requirements. Perfect coordination between these two, can produce optimal results.
The ERP Implementation Steps
Once you are done with the process of buying the ERP software, then comes the implementation stage. The practices to follow are:
Create the database. Collect and store all necessary data.
Keep in mind: You cannot transfer or convert 100% data as there will be some really old and insignificant ones. A complete analysis of the currently available data has to be done to determine the important data to be included in the database. Create a spreadsheet/CSV file to properly segment and store data. A good ERP will allow an easy transfer or upload of data from spreadsheet to the database. Make sure all data transferred to the database is accurate and complete.
Training- An important step to successful ERP implementation
A very crucial step to ERP implementation, training of the staffs in the institution who’re going to use it is necessary to realize all the benefits of an ERP software. If the end-users don’t understand how the system works, the entire purpose of an ERP usage will go in vain. Training documents or any other additional tools required, must be provided to the team getting trained. Usually, the training part comes clubbed with the ERP from the provider. Once the training gets over, a pilot-run of the software in the institute with real data to consider any adjustments is needed.
Go live!
Perhaps, the most satisfying part of an ERP implementation process, going live on the system without any hiccups is always most welcoming. But going live shouldn’t overshadow an important aspect- post implementation matters. Proper utilization of the software and timely maintenance and upgradation are equally important as the ERP implementation.
Adopting the best practices for ERP implementation should be priority for the optimal utilization of an ERP software. If you are looking out for some helpful tips for successful ERP implementation in your institution, we have a write-up for you. Read here.
How to add or remove Fee Particulars and Fee Discounts from Student Fee Collections
 Planning fee collection schedules for hundreds of students is a time consuming process, but something that’s very important and cannot be avoided. To ease the process, many institutions at the beginning of the academic year, plan and decide the various types of fees each batch of students have to pay. All these fee types are then recorded in Fedena and the fee collection dates are scheduled for each batch. Each fee collection will consist of payment and discount heads or as Fedena calls it ‘fee particulars’ and ‘fee discounts’. When the fee collection dates draw near, often times institutions want to make changes to the scheduled fee collections. Institutions either want to remove certain fee particulars or fee discounts, or they want to add new fee particulars or fee discounts for a batch or for a particular student. Here’s how Fedena can handle this.
- Go to the Manage Fee Collections page (module access icon > Administration > Finance > Fees > Schedule Fee Collection Dates > Manage Fee Collections).
- Select the batch and the fee collection.
- If you select Particular, all fee particulars created for the batch, for a student, or for a student category are displayed.
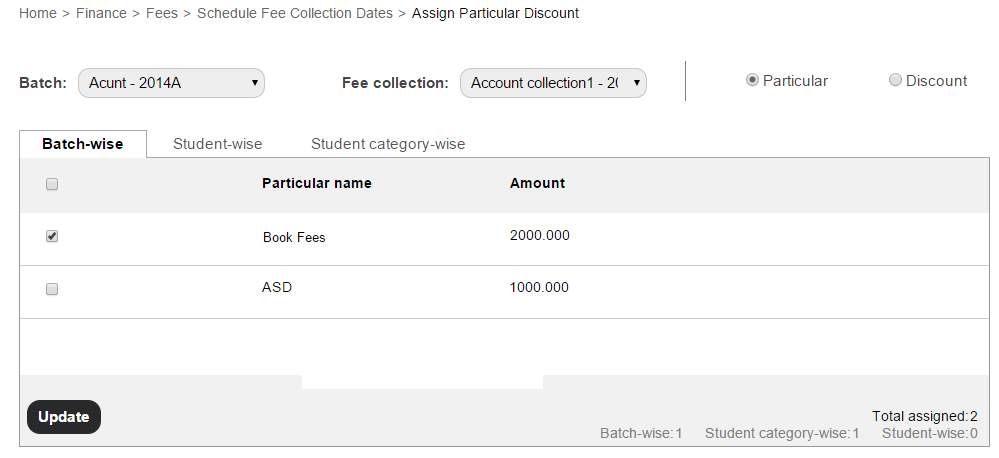 If you select Discount, all fee discounts created for the batch, for a student, for a student category, or for a fee particular are displayed.

- Select the checkboxes to assign or remove fee particulars and fee discounts.
- Click the Update button.
A point to note, if a student has paid the fees towards a fee collection, newly created fee particulars and fee discounts cannot be assigned to that fee collection, neither can existing fee particulars nor fee discounts be removed from that fee collection.
If you are using a Fedena version 3.4 and older, the only solution is to delete the scheduled fee collections, create the new fee particulars and fee discounts or delete the ones that don’t apply, and then schedule the fee collections all over again. This process can get even more tedious if you’ve already started collecting fees from students.
So if you haven’t already upgraded to the latest Fedena version – do it now!
All you need to know about student admission numbers in Fedena
Admission numbers are unique numbers allotted to students on their admission. No two students can have the same admission number in the institution, even if they are admitted to a different course or batch. Admission number may also be referred to as ‘Registration Number’, ‘Student ID’, or ‘Student Number’ in many institutions.
Where do I allot an admission number?
When admitting a student using the Student Admission form (Module access icon > Academics > Students > Student Admission), Admission number is the first field you will see at the top of the form. The Admission number field is a mandatory.
Auto Increment of Admission Numbers
Since every time a student is admitted an admission number must be allotted, institutions can choose to auto increment the admission number. This setting can be set by selecting the Enable auto increment of Student Admission No. checkbox on the General settings page. The first admission number will have to be manually entered according to the convention the institution intends to follow. From the next admission onwards, the number will be automatically incremented. For example:
- If the first admission number is 1, the following admission numbers will be 2, 3, 4, and so on.
- If the first admission number is A1, the following admission numbers will be A2, A3, A4,…A9, A10, A11, and so on. The alphabet ‘A’ will remain constant.
- If the first admission number is 1A, the following admission numbers will be 1B, 1C,…1Y, 1Z, 2A, 2B…2Y, 2Z, 3A, 3B…3Y, 3Z, and so on.
- If the first admission numbers is A, the following admission number will be B, C, D,…X, Y, Z, AA, AB,…AY, AZ, BA, BB…BY, BZ,…CA, CB,…CY, CZ, and so on.
If the Enable auto increment of Student Admission No. checkbox is not selected, you will have to manually enter the admission number every time a student is admitted.
Naming Convention
Institutions can follow a naming convention when creating admission numbers. Make note that admission numbers can only contain alphanumeric characters, underscores, and hyphens. Here are the conventions followed by some schools and colleges that use Fedena:
- School 1 – Year of joining + a unique number. So the student admission numbers looked like this: 150001, 150002,…150067, 150068,…150666, 150667, and so on.
- School 2 – School name abbreviated + a unique number. So the student admission numbers looked like this: DPA0001, DPA0002,…DPA0067, DPA0068,…DPA0666, DPA0667, and so on.
- School 3 – School name abbreviated + a unique number. So the student admission numbers looked like this: DPA1, DPA2,…DPA67, DPA68, DPA666, DPA667, and so on.
- College 1, for students of a particular course – Year of joining + Course name abbreviated + a unique number. So the student admission numbers looked like this: 03ZOO01, 03ZOO02,… 03ZOO44, 03ZOO45.
- College 2, for students of a particular course – Year of joining + College code provided by the university it is affiliated to + a unique number. So the student admission numbers looked like this: 15045201, 15045202…15045244, 15045245.
Is there a quick way to allot student admission numbers?
The easiest and quickest way to create many student records in Fedena is to Custom Import the student admission records. When setting up the CSV file to be imported, enter the admission number for each student according to the naming convention your institution intends to follow.
Admission Number = Fedena Username
The student admission number is also the username that a student will use to log in to Fedena. It is important for students to remember their admission number. Many institutions may also ask the students to mention their admission number in any type of communication with the institution.
Can I change a student’s admission number?
Generally the admission number of a student remains unchanged till the student leaves the institution. However, if the admission number of a student needs to be changed, it can be done at any time from the student’s profile by the Administrator or a Privileged Employee. Students cannot change their admission number from their Fedena login.
Can I allot the admission number of a deleted student to a newly admitted student?
Yes, you can allot the admission number of a student who you have permanently deleted from Fedena to a newly admitted student.
Applicant Registration Plugin
The Applicant Registration plugin allows students to register to courses online. When a student is allotted to a batch of a course, the admission number is automatically allotted. The admission number follows the naming convention of the last admitted student, regardless of whether the last student was admitted to the same batch or to a batch of a different course.
Student Reports
Student admission numbers appear in all student reports including attendance reports, examination reports, course/batch reports, and fee receipts.
Searching Students
In Fedena, you can search for students from several areas based on your user role and privileges assigned. For example, you can search for students using the search bar at the top of your dashboard, when managing user accounts, when scheduling fee collections, when allotting transport, and many more. Apart from using the name of the student to search, you can also use the student’s admission number to search.
Let us know in the comment section if your institution uses a specific naming convention when allotting admission numbers.
Technology in Schools: What are the Opportunities and Challenges
See around and you find how technology has changed the way life is today. The same is with technology in schools- it has opened up a lot of opportunities for sure. The adoption of technology in schools has a different picture to offer in different countries. While some developed countries like the United States are looking for more technology to integrate in their schools, countries from the lesser developed parts of the world are still struggling with how to integrate technology in schools. While, there are lot of opportunities that technology has to offer to education institutions at all stages, there are some shortcomings that’s preventing widespread acceptance of technology in schools all over the world.
Opportunities are wide for technology in schools
When you talk about the opportunities for integrating technology in schools, we can actually see how technology is already transforming the way teachers teach in schools- a drift from text-based learning to something that would involve and engage students in the best possible way. Opportunities are plenty; here, we talk about four such opportunities that have every potential to take education to the next level.
- A global learning platform is surely one blessing bestowed with the introduction of technology in schools. Students can opt to learn foreign language from natives of the particular country through videoconferencing. A lot of websites have come up with this kind of learning sessions via video conferencing call, letting students experience educational benefits minus the travel cost involved.
- A paperless classroom is on the way. Cloud-based apps and tools like Google Drive, Gmail, Google Docs have a smarter way to offer to students and teachers to carry on their daily classroom learning. A definitely affordable option to save more time than the traditional methods of classroom teaching.
- A great opportunity for technology in schools lies in the form of virtual reality (put the backlink to our blog)in classroom. Virtual reality has the power to transform classroom into a practical field for students to experience real life applications in a virtual world.
- E-books have huge potential to change the face of education in the coming days. A lot of schools from different parts of the world have already discovered the huge potential of e-books, yet, some schools remains unaware.
There are challenges too!
The introduction of technology in schools is surely not an easy road to success. It has its share of bad patches which are to be met with.
- Coming out of the comfort zone and accepting technology in schools is perhaps one of the biggest challenge to face with. Most of the times, teachers and school authorities are reluctant to experiment with new technologies in classroom, for they consider these experimentations are beyond their job descriptions.
- Technology in schools has another setback- most schools are hesitant to implement distance courses, unlike the universities who have already joined the bandwagon of online courses.
- The costing factor is always a prominent challenge for the adoption of technology in schools. Most schools do not have the funding to support the use of technology in schools. There is an initial cost involved in the purchasing and installation of technology. Moreover, the cost of maintenance, upkeep and upgradation involves an ongoing cost, which is, at times, financially unsustainable for most K-12 schools.
There are challenges to face; but the biggest test is to face these challenges, overcome and accept technology in schools and revolutionize education with improved opportunities for students.
Little Improvements to help you Personalize Fedena & Improve your Efficiency

The Fedena team loves building new features that enable you to do things that weren’t possible before. But sometimes, it’s the small details that make a big difference. Along with all the big features that we have been releasing, there are also a number of little features and improvements we’ve made to Fedena. Here are some recently introduced features and improvements that will allow you to personalize Fedena and improve your efficiency as well.
Date Format
Fedena comes with a standard format for showing dates. However, you can change the date format to what you’d like in the General settings page. The date formats you can choose from are:
- DMY – Date/Month/Year
- MDY – Month/Date/Year
- YMD – Year/Month/Date
In addition to the format, you can also choose a date separator you want to use, a forward slash (/) or a hyphen (-).
Something to note is that wherever dates are displayed in Fedena, they are displayed in predefined long formats (March 10, 1986) or short formats (10/03/1986).
K-12 vs. Higher Education
What type of institution are you? A K-12 institution who teaches preschool to class 12 or a college or university that offers various courses? You can choose your institution type in the General settings page.
- If you select K-12 as the institution type, the term ‘Class’ is used throughout Fedena’s interface to indicate ‘a year of education’. ‘A year of education’ can be, Grade 7, Class 7, Standard 7, or Form 7, depending on your country’s educational system.
- If you select Higher Education as the institution type, the term ‘Course’ is used throughout Fedena’s interface to indicate ‘the study of a particular topic’ such as, Bachelor of Zoology, Master of Business Administration, and so on.
Language Settings
Today, Fedena is used all over the world to manage an institution’s day to day activities. Fedena has been translated into the following languages:
- Deutsch (German)
- Dominican Español (Dominican Spanish)
- Dutch
- English
- Español (Spanish)
- Galego (Galician)
- Italiano (Italian)
- Russian
- Türkçe (Turkish)
- Français (French)
- Português (Portuguese)
- tiếng Việt (Vietnamese)
- монгол хэл (Mongolian)
- العربية (Arabic)
- کوردی (Kurdish)
- मराठी (Marathi)
- हिंदी (Hindi)
- ગુજરાતી (Gujarati)
- 中國的 (Simplified Chinese)
- 日本の (Japanese)
Instant Fee Particulars & Instant Fee Discounts
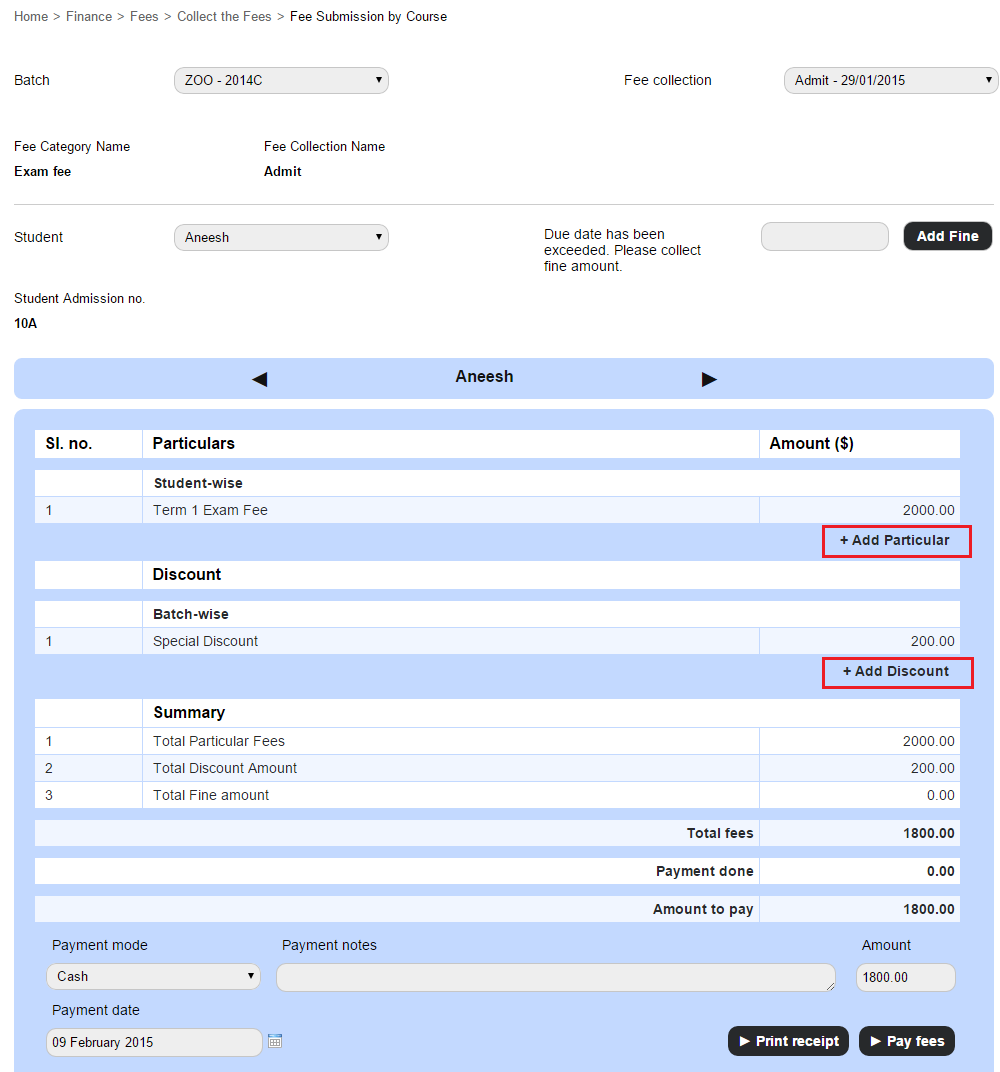
It can be a challenging task to schedule and track fee payments for all the students in your institution. Sometime, after meticulous planning and scheduling, you realize you have left out some students, or there are some last minute fees that a student has to pay. In such instances, you need not go through the complete process of creating fee categories, fee particulars, fee discounts, fines, and then setting up a new fee collection schedule. You can create instant fee particulars and instant fee discounts at the time of collecting and processing student fees.
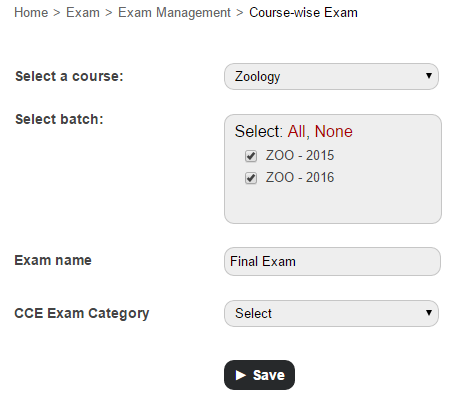
Course-wise Exam
If two or more batches of a course are being taught the same subjects, you can schedule an exam for all batches, or only selected batches at the same time.
- Go to the Create exam page (Module access icon > Academics > Examination > Exam Management).
- In the top right, click the Course-wise Exam button and then schedule an exam.
Processing all student fees. One screen.
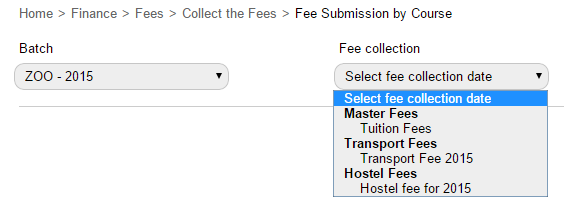
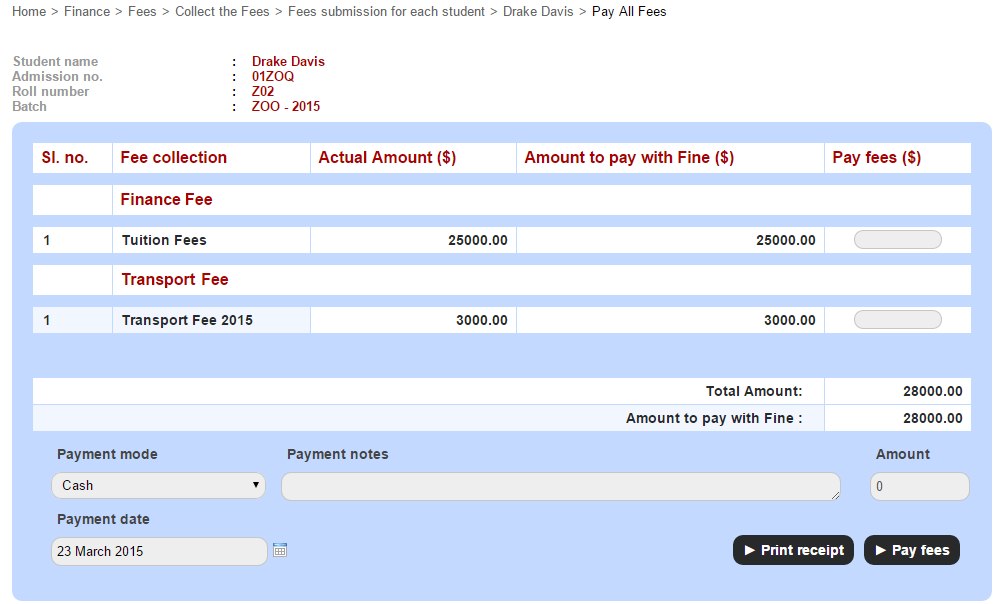
Why go to a different module every time you need to collect and process tuition, exam, hostel, transport, or any other fees for a student? It can all be done form one screen in the Finance module.
You can either do it when collecting fees batch-wise:
Or when collecting fees from each student using the ‘Pay All Fees’ option:
Activating and Deactivating Batches
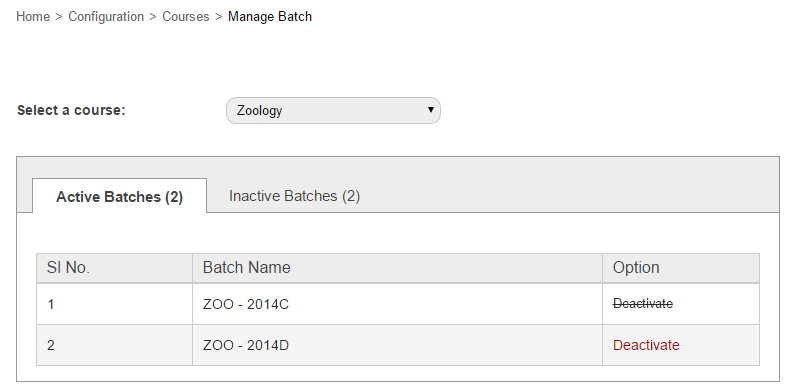
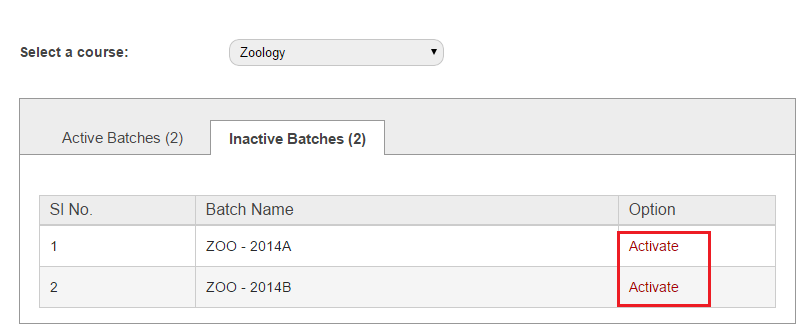
When all students of a batch are transferred or graduated, the batch automatically becomes inactive. But did you know you can also manually activate and deactivate batches from the Manage Batch page (module access icon > Administration > Settings > Manage Course/Batch > Manage Batch)? Say you’ve created a batch and then decided you don’t want to use it immediately. So you don’t want to delete it, but at the same time you don’t want empty batches to appear in all the dropdown lists. In such instances, you can deactivate the batch temporarily and activate it only when you decide to use it.
Or, if you just want to view the list of inactive batches, you can do that as well.
