Adding Custom Fields to Record Transport and Hostel Information

Custom--transport-&-hostel2
The latest version of Fedena has many new features as well as enhancements that extend its flexibility and benefits. One of the features added is the ability to add custom fields to record any information about your institution’s transport and hostels.


So the next time you use the Transport plugin to record vehicle and vehicle route information, or the Hostel plugin to record hostel and hostel room information, just remember, you can add custom fields to record any additional information deemed required or important to your institution.

Who can add custom fields?

Administrators and privileged employees (Transport Admin or Hostel Admin privilege must be provided) can add custom fields.

How to add custom fields?

Transport

  1. Go to the Transport module (Module access icon > Administration > Transport).
  2. Click Manage vehicle additional details to add custom fields to record additional information about your institution’s vehicles, or click Manage route additional details to add custom fields to record additional information about your vehicle routes.
    1 (2)
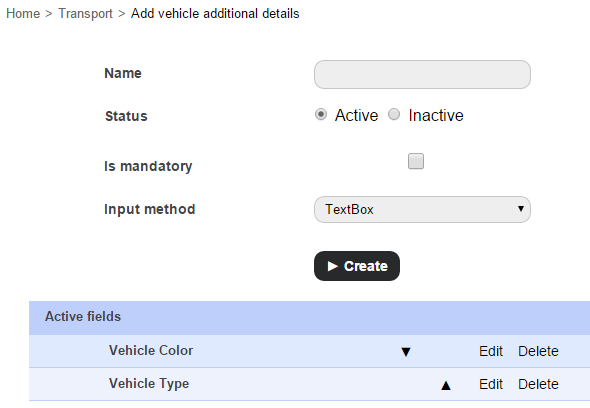
  3. Enter the name of the custom field.
  4. Select the status of the custom field from the following options:
    • Active – A custom field with this status will be available when recording vehicle or route information. For example, in the image below, the highlighted fields were custom added fields.
      2 (2)
    • Inactive – A custom field with this status will not be available when recording vehicle or route information.
  5. Select the Is mandatory checkbox to set this field as a mandatory field that must be filled.
  6. In the Input method field, select the field input method from the following options:
    • Text Box – Enter brief text information.
    • Text Area – Enter detailed text information.
    • Select Box – Select an option from a drop-down list.
    • Check Box – Select one or more items from a set of options.
  7. Click the Create button.
  8. Use the arrow icons ( 3 ) to determine the order the fields will appear in when recording vehicle or route information.


Hostel

  1. Go to the Hostel module (Module access icon > Administration > Hostel).
  2. Click Manage hostel additional details to add custom fields to record additional information about your institution’s hostels, or click Manage room additional details to add custom fields to record additional information about your hostel rooms.
  3. The rest of the procedure is the same as for Transport.

Custom additional fields can be made inactive at any time by editing and selecting the Inactive radio button. Once a custom field is made inactive, it will no longer be available when recording transport or hostel information.

4

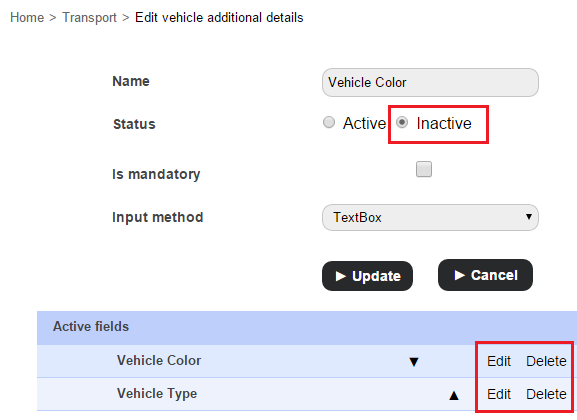
Custom fields can also be deleted, but only if it has not already been used to record transport or hostel information.

How to Revert an Archived Student

Revert-Archived
In our previous article, we showed you how to archive a student record. We also told you that when a student record is archived, the record moves from the active record list to the former record list. The record is not deleted from Fedena, so you can always find it later using the Advanced Search function. But there are times when you may need to revert an archived student record and make it active because:

  • you graduated a student in Fedena who was not eligible for graduation.
  • you accidentally archived the wrong student.
  • you are admitting a former student to your institution.

Whatever the reasons maybe, you can revert a student record as long as you’ve archived it and not deleted it.

Who can revert an archived student?

Administrators and privileged employees (Manage users, Admission, or Students control privilege must be provided) can revert an archived student.

Procedure

  1. Use Action Search at the top of your dashboard to search for an archived student. Search using the student’s first name, last name, or student admission number. When searching for a student, make sure to click Search students.
    1
  2. Click on the student name. The student’s profile is displayed.Revert an archived or graduated student
  3. In the top right, click the Revert archived student button.
  4. Click OK to confirm.

Does all records and settings get restored?

When an archived student is reverted, all records and settings including the student’s login credentials and batch information are restored except the following:

  • Any placement details that the student was part of
  • Online exam marks entered for the student
  • Hostel room allotment details
  • Transport route allotment details

Can Technological Reforms in Education Improve our Job Prospects?

Job-Prospects
“If we teach today as we taught yesterday, we rob our children of tomorrow.”
– John Dewey

We use technology in every domain of our lives. Be it education or household chores, without our prized gadgets we feel incomplete. However, have you ever wondered whether this technology is actually improving our work or have we just become super habituated to this trend so as to ignore the direction of its impact? For example, is technology really improving the quality of education in the world or is it just a fad that every individual is running after?

The Answer…

Initially, education technology was a simple debatable topic in the society. It soon grew into a massive idea with Steve Jobs entering the fray and proclaiming his vision for education. All he wanted to achieve was to revolutionize teaching and learning, which he did, leaving behind a legacy of numerous technological and educational apps.

To elucidate more on the topic of this article, there is no doubt that technology has improved the quality and standard of education in the world, but has it done so for the betterment of our future? Can you expect to land a great job because of the learning achieved through superior methods of teaching? The answer is, yes. Technology allows students to construct their own knowledge base, which can be employed to enhance business practices at work. It is but the bridge that connects education and employment. Here is a glimpse of the greatness that education technology has brought to the domain of employment:

  • Sparking Innovation

    Innovation has the tendency of killing jobs in order to construct some new ones. The society is progressing and its inhabitants are becoming richer by the moment, demanding more goods and services. 100 years ago, a majority of individuals across the globe were involved with farming. Now, a very less percentage of that number work in fields, but produce much more amounts of food. The millions freed from the land have not become jobless, but have found better-paying work with the evolution in economic and educational reforms.Needless to say, this universal change in tactics has its roots in educational restructurings. Exposure to technology at a young level has made individuals more aware of their surroundings and mental capabilities. Students can channel and package their creative genius in ways that were unknown in the past. Technology can give you wings. More so to the younger generation who can use this reform to spark innovation and think outside the box. A highly ingenious mind is always attractive to an employer, thereby improving employment opportunities.

  • Stimulating the grey matter

    The best answer to the topic of this discussion – reforms in education can improve your job prospects because of how they stimulate and excite the grey matter. Apart from improving your analytical and problem solving skills, exposure to all that information in a short period of time improves relationships and has the ability to bridge cultural gaps.A student well-versed with the latest trends can approach an employer with greater confidence and a positive attitude. Such an individual has the correct knowledge base required for the smooth functioning of an organization. Maturing at a young age through the magic of education helps in adapting to diverse situations and work cultures. Ensure that this personality trait is visible to a hiring manager.

  • Global reforms

    Digital revolution at a young age has unleashed an overwhelming amount of prosperity felt by both the low-skilled and high-skilled worker. The world has progressed and jobs in the IT, software, and programming sectors have become very popular with the masses. Online learning and virtual classrooms give a glimpse of technology that drives most business processes. Exposure to the same at an early age, before you start improvising at work, gives a better sense of what you are dealing with.Distance learning programs at school level foster national and international relations. Learning from educators from a foreign land helps in developing confidence and broadening your mind-set that can be put to use when sitting for a job interview. With the help of internet, students can share their experiences with thousands of individuals. This helps in accelerating the rate of knowledge acquisition. Social media websites aid in networking and establishing contacts all over the world. Be it Facebook, Twitter, or LinkedIn, connections made on these portals can stay for life.

  • Universal opportunities

    The modern methodologies of teaching are pretty much common all over the world. You could use a laptop to finish assignments in India and in America. Common teaching practises put every student on an equal platform. In another 10 years, children across the globe will have equivalent access to information for their subsequent growth and development. As such, it will also change the entire hierarchy of employment process. If every child is the same, how do you select the best?This is where “application” of the acquired education comes into play. Students with enhanced analytical and problem solving skills stand a better chance of being employed than their competitors. Talking about universal employment opportunities, gone are the days when jobs were listed only in the newspapers. With online job portals, several sites have emerged in India and abroad which provide a list of all the employment options available for a range of verticals. Honestly, there is no dearth of opportunities today.

Conclusion

Great innovators like Steve Jobs envisioned that if passionate teachers serve students in a meaningful way, they can definitely address their potential for success. He not only wanted the teachers to embolden the students, but also to equip them with faculties required to think outside the box. Revolution has just begun and it will surely impact our future generations, positively, in times to come.

The article is written by:

Tina Jindal. She is a professional writer who works on a variety of topics like employment, real estate and on job sites in India. She has been involved with renowned publications and has tried her hand at editing works on Cookery, Gardening, Pregnancy, and Healthcare.

The Way We Test has Changed

TestTeam (1)
Hello folks,
Greetings!

First of all, let me introduce myself. I’m Gautam, the new Test Lead at Foradian. The intention of this article is to let you all know about the way testing has changed at Foradian over the past few months and the benefits we have derived out of it. This article would be of interest to all those who have got bored of the Conventional Approach to Testing i.e. maintain elaborate test cases, execute them and mark them as “Pass/Fail”, and repeat the test execution over multiple cycles in a monotonous manner! Have you come across testers who would say “Testing is so boring”? If yes, they are right, because the approach they used to test might be boring! Making the testing activity as boring or interesting is completely in tester’s control. Do read on to find out how our Testing Team has benefited by using the Exploratory Testing Approach rather than the Conventional Approach. By the way, it feels glad to inform you that our Test Team has grown in size from 2 to 5!

Here’s the feedback from a couple of our testers!

Sreeshanth, our Senior Tester says:

I was unaware of the Exploratory Testing approach when I began my career. I got a taste of it in July 2014. I learnt that Exploratory Testing  refers to simultaneous test design, test execution and reporting. In this, the tester has complete freedom to test the application of interest. In my opinion, the earlier test approach we followed was more time consuming than the current one. Previously, after completion of the development process, we directly started testing by creating a document, which was also shared with the developers. First we tested in the dev’s local server, and once all issues were fixed, we used to begin testing in the test server.

With the use of Exploratory Testing approach, a lot has changed. When we get a new feature to test, we won’t know much about the behavior. So initially, we go through the SDS and SRS to get a fair idea about the feature. Later we brainstorm using mind maps. I felt mind mapping is the perfect tool to brainstorm test ideas and execute them, gradually evolving our test ideas while testing. This way, testing becomes interesting and empowers the creative side of testing, which feels rewarding too. After this, we create lean test design (Test ideas and scenarios without elaborate steps to be performed) in excel format and share it with the developers. The important thing is, we start the testing process even before the development begins, which is also helpful for developers to understand the feature from an end user’s perspective. After a feature is developed, we execute tests in the test environment and report the results. With this approach, we could test faster and with more creativity.

Ali, another Senior Tester says:

I would consider the change in the test approach a welcome change, when compared to the methods used by my previous employers. From what I understand, the earlier approaches were tedious and time consuming. They sucked the fun out of testing. I believe it is important for the tester to enjoy his testing activities. Conventional test approach limited the exposure to practical scenarios that would be encountered by the user. Since the tests were scripted and static, it also lead to limited expectations.

With the use of ET, we do not document the expected results, because there could be many and it’s up to the tester to identify them while testing. ET provides personal freedom since testing is not defined in advance. I found it to be intellectually stimulating. The use of mind maps enables me to make note of the important areas to be covered during testing. I remember having used it during my early days in Foradian for testing a feature along with Gautam. Exploring one module or scenario opened doors to many other possible scenarios. ET gives better coverage too. It is important to find the critical defects in a timely manner and ET helped in identifying the critical defects very quickly. Usually with ET, there is the risk of not being able to recreate the scenario that led to the issue in the exact manner, but this is taken care by the lean test documentation approach we follow. Mind maps and test reports are maintained for documentation.

Our New Test Approach

Involving the Testing Team in the UX Design phase itself, so that UI/UX bugs could be identified well in advance, rather than during testing. We do the Test Design as soon as the UI prototypes are available, and add more tests during the Exploratory Testing phase.

  • Implementation of the Test Strategy mind map for every feature to be tested, lists the probable areas impacted by the feature. This list actually expands our test ideas to achieve better test coverage. This would also help our developers to know and handle impacted areas across modules.
  • Following the Lean Test Documentation (Flexible excel template for listing only the test ideas and test scenarios, excluding elaborate test steps, and marking the test execution results against them) approach helps us devote less time for Test Design and more time for Exploratory Testing.

Here’s a sample Test Strategy mind map for your reference!

Revert Archived Student. - Test Strategy
To conclude with, we are committed to test your favorite Fedena much better, resulting in minimal bugs which hardly bug you, thereby giving you an enhanced user experience! Team Foradian is thankful to you for your unprecedented support and cooperation.

The article is written by:

GautamGautam M S
“Gautam doesn’t breathe air, he breathes testing instead. He is a disciple of the Context Driven Testing community and testing is his way of living. You can’t convince him without logic! He believes testing is a scientific way of analyzing things at hand!”

ERP in Education: The pros and cons of ERP implementation in education

ERP-Jan29_15 (1)

We live in a world where computers are omnipresent; technology has entirely changed the way we live, towards the better. And education is one such name where technology and the use of computers have changed the way it is delivered, completely different from what it used to be in the last decade. Other than various new learning techniques like online courses, smart classrooms; technology has equally simplified the management of educational institutions.ERP implementation have been revolutionizing institutional management for sometime now, helping institutions to improve their operations, thus making them manageable and more transparent.

ERP in education is not a new concept; ERPs were in full-fledged use in major corporations in some of the biggest industries, to ease the management process. With the development of technology and widespread demand for computing concepts has led to the increasing popularity for ERP solutions in other industries like educational institutes.

ERPs over traditional system of management

So, what gives educational ERP the edge over traditional method of management? Definitely, its the time and efficiency factor that places the software ahead of the traditional methods. Managing funds in an institution and tracking them into a report almost sounds like rocket science if done manually. A lot of productive time goes into meeting this kind of specific requirements. Moreover, management of a lot of basic operations like inventory, HR, finance and other services at times appear a complex task. Educational ERP implementation can ensure an institution function at its maximum potential.

The benefits of an education ERP system


An education ERP definitely has a lot to offer, like-

  • Cost effective: Perhaps the most prominent advantage of using ERP in education is the costing factor. Saving on the amount of man hours let you save so much on finance. Basic campus management requires a lot of manpower to manage things like fee collection, the grueling admission process, etc. When this management is done online, a lot is saved on the finance sector which can be used in other useful purposes.
  • Better organization of data: Organize your data the way you want. Education ERP gives you a lot of ways to organize data of your institution that would help in proper management of it. Data is managed well and available with a single click of a mouse.
  • Data is secured: Data or information stored in web servers are far more secured that those stored physically in shelves. Storing information and data stored by ERP software in servers have backup systems and thus, your information is preserved! Is it possible with physical storing of data and files?
  • More automated administration: The entire administration which was otherwise managed using huge manpower, involving all possible flaws that are not tracked easily and managed. With education ERP, the point of flaws in managing important administration processes like fee collection, library books, admission list, etc is nearly minimal, unless there are some human errors in filling up information or technical glitches.
  • A quicker management process: Education ERP software quickens the entire process of institutional management to great extent, lets say in a matter of seconds. All you need to wait for is the implementation of the ERP software and you are set for a faster management of your institution like never before. Be it the admission process of an entire new batch of students or generating customized reports on a particular batch is a task done in minutes.
  • More focus on education: When most of the time is saved from taking one-to-one attendance in class or filling up the mark sheet after every exam, a lot of time is saved to be invested in what is more important- teaching!

The limitations of an education ERP

Of course, there is other side of the coin too! Even if the management of your institution is available within the single click of a mouse, there are some limitations that prevents institutions to choose education ERP solutions for better management. Some of them being,

  • One failure of ERP in education can be measured in terms of achievement of Return on Investment (ROI). When the ERP implementation doesn’t yield enough ROI, it can be a failure.
  • The cost of ERP, its planning and implementation, customization, configuration, etc might be too much for lesser profit-driven schools.
  • Most ERPs are difficult to learn and use. With complicated user interface that requires thorough user training, it requires complete participation of users.

Time has come for all educational institutions to go the smarter way. Re-organize the management systems of your institutions to match the evolving technology in every aspect of life.

Tracking Student Attendance just got Easier

Fedena-Blog---DailyAttendance_b
Tracking student attendance for your institution is very important. It helps you evaluate its quality, make timely administrative and financial decisions, and plan events such as fire drills and other institutional activities. Being aware of student attendance is not only important for your institution but also for your students. Regular attendance is important to a student’s academic success. Knowing your student attendance will help identify absence trends and give the institution the necessary data to establish an action plan to change the attendance culture of an individual student or a group of students. To help you with all this, we’ve introduced the Day-wise Attendance Report as part of Fedena 3.4. On any given day, you can now easily track the overall student attendance of your institution, as well as for each batch.

Who can access the report?

Only Fedena administrators and privileged employees (either the Student Attendance Register privilege or the Student Attendance View privilege must be provided) can view the Day-wise Attendance Report.

How to access the report?

After you log in to Fedena, go to the Attendance module.
1

Remember, this report is available only if you mark student attendance Daily.

What does the report show you?

The Day-wise Attendance Report displays the number of students present in your institution, as well as the number of students absent in each batch on a particular day.
Generate the student day-wise attendance report

To view the student attendance count for a previous date, all you need to do is change the date. The Overall Strength in the top right is the total number of students present in your institution for the selected date.

Use the Select a course field to view the number of students absent in each batch of a particular course. You can then click on a batch to view the names of absent students.

Generate the student day-wise attendance report1

To generate a CSV report of the number of students absent in each batch, click the CSV report button.

Take Control Over Your Sales

Take-control-over-sales (1)
For institutions who constantly purchase and sell items, managing inventory can be just as crucial as managing finance. And if you thought tracking all your institution purchases were hard, tracking outgoing items and their invoicing can be even harder.

Introducing ‘Sales in Inventory’, a feature part of the Inventory plugin that enables institutions to easily record and track items they sell. From student uniforms to textbooks to sports equipment, now sell any item and let Fedena do the rest of the work. And what good would it be to make all those sales and not know the status and value of the items sold. Fedena generates comprehensive sales reports that help you keep track of your store sales, the availability of items, and the amount collected for each item.

Workflow to set up and to track items sold
Flowchart

Who can manage items for sale

Fedena administrators have complete privileges over the ‘Sales in Inventory’ feature. Administrators can set up items for sale, create sales invoices, as well as generate sales reports. Fedena offers the following inventory privileges that can be assigned to employees.

Privilege Control
Employee Manager Inventory Setup items for sale and generate sales reports.
Manage Inventory Control the complete Inventory module, which includes all activities connected with ‘Sales in Inventory’.
Inventory Basics Set up items for sale.
Inventory Sales Create sales invoices and generate sales reports.

Step 1 – Create an item category

The first step would be to create the item categories under with each item can be recorded and sold.

  1. At the top of your dashboard, click the module access icon > Administration > Inventory > Item Category to open the Item Category page.
    1
  2. Enter the name and category code, and then click the Save button.

Step 2 – Record a sellable store item

  1. At the top of your dashboard, click the module access icon > Administration > Inventory > Store Items to open the Store Items page.
  2. In the top right, click the New button.
    2
  3. Enter the item details.
  4. Select the Sellable checkbox.
  5. Select an item category.
  6. Click the Save button.

Step 3 – Advertise and sell the item

Now that you’ve recorded the items to be sold, how do you let everyone know that a sale is on? The answer is right in front of you – Fedena. You can use Fedena to seamlessly communicate to your students, parents, and employees. Some of the best ways would be to:

  • Use the News module to announce to the whole institution that a sale is on.
  • Use the SMS or Email module to send a message.
  • SMS and Email settings not configured? Not to worry. Use Fedena’s internal messaging system to send out a quick note.
  • Already have discussion groups setup in Fedena? Use the Discussion module to share the message.

Step 4 – Create a sales invoice for the items sold

Complete your sale by creating a sales invoice and issuing a copy to your customer.

  1. At the top of your dashboard, click the module access icon > Administration > Inventory > Billing to open the Invoice page.
  2. In the top right, click the New button.
    3
  3. In the Store field, select the store to which the item belongs.
  4. In the Issued to field, enter the Fedena user ID to search and select the user. The Name field and Address field automatically populates the user information.
    Note: If the customer is not a Fedena user, you can manually enter the customer’s name and address.
  5. Enter the billing details. You can search for the item using the item code or item name. If required, you can create an invoice for more than one item clicking Add New Item.
  6. In the Tax (%) field, enter the item(s) tax.
    4
  7. Enter any additional charges or discounts applicable. The Total is the amount to be paid by the customer.
  8. Select the Is Paid checkbox if the item is paid for.
    Note: You can create an invoice even if the item(s) is not paid for. When you later receive the payment, you can edit the invoice, select the Is Paid checkbox, and then save the invoice.
  9. Click the Save button to create the invoice.
    5
  10. Click Print to print the invoice.

You can always print the invoice at a later time as well. Go the Invoice page (module access icon > Administration > Inventory > Billing), and then search and select the invoice to print.

Step 5 – Generate sales reports

Use the following reports to know how your sales team has performed:

  • Item-wise Report
  • Day-wise report
  • Invoice Report

Item-wise Report

Use the Item-wise Report to view the availability of items and the amount collected for each item.

At the top of your dashboard, click the module access icon > Administration > Inventory > Reports > Sales Reports > Item-wise Report.

6

Day-wise Report

Use the Day-wise Report to view the amount collected and the total number of sales made by each store on the specified date(s).

At the top of your dashboard, click the module access icon > Administration > Inventory > Reports > Sales Report > Day-wise Reports.

7

Invoice Report

Use the Invoice Report to view the list of invoices together with their details for the specified date(s).

At the top of your dashboard, click the module access icon > Administration > Inventory > Reports > Sales Report > Invoice Reports.
8

You can also click on an invoice number to view the complete invoice details.

So there it is, use Fedena to record and track the items your institution sells and ensure proper financial management and accurate reporting.

Archiving or Deleting a User Record

Archive
The difference between archiving and deleting an employee or student record is – when you archive an employee or student record, the record moves from the active record list to the former record list. It does not delete the record from Fedena, so you can always find them later using the Advanced Search function. When you delete an employee or student record, all data associated with the record is removed. You cannot restore deleted records.

Who can archive and delete?

Only Fedena administrators and privileged employees can archive and delete employee and student records. For a privileged employee to be able to archive or delete employee records, either Manage Users or HR Basics privilege must be provided. Similarly, to be able to archive or delete student records, either Manage Users, or Admission, or Students Control privilege must be provided.

Archive or delete an employee record

When archiving or deleting an employee record, the following two options are available:

  • Employee leaving the institution – Use this option to archive and move the employee from the active employee list to the archived/former employee list.
  • Remove employee records – Use this option to delete all information associated with the employee. Once deleted, the employee record cannot be restored.

Note: You cannot delete an employee record that has dependencies—such as, subject association, part of a discussion group, and so on—in other Fedena modules. Unless the dependencies are removed, you cannot delete the employee record.

  1. Go to the employee’s profile. You can find the employee using the search bar at the top of your dashboard, or through the Manage Users page (Module access icon > Administration > User).
  2. When you find the employee, click on the employee’s name to view the employee’s complete profile.
  3. In the top right, click the Delete
1

The Remove employee page is displayed.
2

  1. If you want to archive the employee record, select the Employee leaving the institution You must specify the reason for the employee leaving, and then click the Delete button.
    3

If you want to permanently delete the employee record, select the Remove employee records option. A confirmation message is displayed. Click OK to confirm removal.

Archive or delete a student record

When archiving or deleting a student record, the following two options are available:

  • Student leaving institution – Use this option to archive and move the student from the active student list to the archived/former student list.
  • Remove student records – Use this option to delete all information associated with the student. Once deleted, the student record cannot be restored.

Note: Unlike employees, student records can be deleted even if the student has dependencies in other Fedena modules.

  1. Go to the student’s profile. You can find the student using the search bar at the top of your dashboard, or through the Manage Users page (Module access icon > Administration > User).
  2. When you find the student, click on the student’s name to view the student’s complete profile.
  3. In the top right, click the Delete
    4

The Remove student page is displayed.
5

  1. If you want to archive the student record, select the Student leaving institution You must specify the reason for the student leaving and the leaving date, and then click the Delete button. 6

If you want to delete the student record, select the Remove student records option. A confirmation message is displayed. Click OK to confirm removal.

If the student has dependencies in other Fedena modules, a warning message similar to the image below is displayed.
7

If you still want to delete the student record, click the link.

Now that the student record is archived or deleted, you may be wondering what happens to the associated parent record. So here’s what happens:

  • If a student record is archived, the parent record is no more active. However, if the archived student is a sibling, the parent record will remain active.
  • If a student record is deleted, the parent record is also deleted. However, if the deleted student is a sibling, the parent record will not be deleted.

There are many reasons why an institution would want to archive an employee or student record in Fedena. It could be because the employee no longer works at the institution, or the student has moved to another school, but you want to keep their information in Fedena so you can access it at any time. Similarly, there are many reasons why an institution would want to delete an employee or student record permanently. It could be because a duplicate employee or student record was created, or a factitious record was created when learning Fedena, or a record was created accidentally or with incorrect information.

Whatever the reasons may be, Fedena offers the flexibility either to archive the records or to delete the records permanently.

Generate ICSE reports with ICSE grading feature by Fedena 3.3

ICSE (1)

In our last post on ICSE grading system feature by Fedena 3.3, we have discussed about the configuration that you need to do before you start using the feature. Once you’re done with the configuration, the next step requires you to enter the marks of students. The feature also allows you to generate reports based on the marks of students. Read the article and find out more on generating ICSE reports.

How to generate ICSE Reports

When you login to your Fedena account, you are required to go to ‘ICSE Reports’ in ‘Examination’.

1
As you can see in the screenshot above, the Reports Center has four options:

Generate Reports: You can generate a report on the student scores entered. Next, you need to select the particular course for which you want to generate the report.

23
View Student Report: To view the report of particular students, you can use this option. It gives you the score card of students.

4
As you can see, this is a report card of a particular student. Likewise, you select other students from ‘Students in this batch’ as marked in the screenshot. A ‘Term’ is used in most ICSE institutions under which the examinations are conducted. Most schools have two terms- Term 1 and Term 2 exams.

Subject-wise Report: Similarly, you can also generate report of students based on subject.

5
Consolidated Report: Get a consolidated report of all the subjects together for students.

6
The consolidated report of students in the particular course and batch.

Note: Generating report is highly flexible and it offers you the option to generate reports on multiple combinations in subject-wise and consolidated report. This means, you are allowed to generate reports based on terms, on internal marks alone or external marks or a combination of both, etc.

Create and publish feedback forms using Form Builder plugin

Form-builder


With Fedena 3.2, you can now enjoy a very new and exciting plugin called the Form Builder. One of the biggest advantage of this new plugin is that it helps you create feedback sessions in your institution. Create and publish feedback forms in few simple steps which are mentioned as you go through the article. Read on to find how you can create and publish feedback forms easily.

Create feedback forms as an admin or a privileged employee

When you login to your Fedena account, go to ‘Forms’ in ‘Collaboration’. From there, you need to go to ‘Create form templates’ where you need to create the new form template. 

form builder_1

Drag whatever fields you want in your form template from the left column to the right one as shown in the above screenshot with the arrow. ‘Save template’ if you want to use the same template again in future. Else, ‘Use’ button will help you to use the template for the particular feedback session you want. Don’t forget to give a name to the form at ‘Form name’.

You have to create the form, put in all necessary information and for which, you have to go to ‘Form templates’ and select the respective template.


form builder_3


Fill in all necessary information to complete creating the feedback form. Once you are done with creating the form, you can go to the next step.

form builder_2


Before publishing the form, you have to select whether its a feedback form and also the recipients from the particular department and batch. Also, you can select if the feedback is meant only for students or parents or both.

When a student login to take part in the feedback

The students who are assigned to take part in the feedback session, will get message. Once selected, it will help in viewing the message.

form builder_4


Click on the link to go to the form and fill it up.

form builder_5


Once the form is filled, click on the ‘Submit’ and it will go the admin.

Login as admin to see responses for the feedback session

The admin can see the responses by navigating through ‘Manage Forms’. Click on the particular form to go to the form submission page.

form builder_6


You can extract the responses as CSV file or go for ‘Analysis’ also. Thus, an easy and smart way to conduct a feedback session at your institution.


Re-arrange and randomize questions in Online Exams with Fedena 3.2

Rearrange-Questions
Conducting various type of exams often require you to frame questions and rearrange them for each question paper. And this task is without any doubt, much hectic, rearranging the questions for all the students. But with the question re-arrangement and randomize option, you don’t have to spend your time doing the same yourself. Read the article and know how you can use the options for examinations.

How to do it

Arranging questions takes place in two types- rearranging it yourself and using the randomize option.

In case the questions are arranged manually

Login to your Fedena account and go to ‘Online Exam’.

1

Select ‘View Online Exams’ and go to the respective page to select the particular online exam where you want to make the new updates with arrangement of questions.

2

Select the particular online exam to do the modifications. Once you select the particular online exam, it will take you to the particular online exam detail page.

3

The ‘Rearrange Questions’ option lets you rearrange the questions according to you.

Using the ‘Randomize’ option

When you don’t rearrange questions manually, use the ‘Randomize’ option.

4
Just select the ‘Randomize’ option and the order of the questions will change every time a different student appears the exam. Thus, a perfect help for conducting different type of exams.

Anytime Anywhere Data: Key to Effective Institution Management

Vishwajit

When we talk about effective institution management, we cannot deny the fact that the effectiveness that we talk about, focus on institutions of the 21st century. When education has moved beyond the peripheral of an actual classroom, how can management be limited to it. When teachers are not mere carriers of knowledge, but the right guidance to students in their quest for knowledge. When education has come out from the limitations of chalks and boards, books and pens and has moved into a virtual sphere connecting students and educators all over the world, management too, has to be at a level to match with the changing face of education and learning. And this kind of management should have systems in institutions that would facilitate better teacher student coordination, more consistency in approach and action throughout the institution.

Effective management of institution is crucial. Why? Well, think about a well connected and adequately communicated team of teaching and nonteaching personnel with defined roles and tasks. And administrators with access to data will have a proper control of the institution, with more transparency and accountability. Moreover, easy access to data can assist educators and administrators of institutions to study data from the past, analyze it and come up with solutions that would bring out wonderful results for institutes. Take for example, study of data gathered from the past can help educators to analyze the use of various educational reforms in their institutions. Collecting and studying of student data can help teachers and professors keep a track of student performances, their weak areas of learning and finding out ways to rectify them.

With education going global, more and more online courses coming to use, connecting students and educators across the world, management of these virtual institutions require availability of data anytime that can be accessed from anywhere. This kind of accessibility were things of impossibility till some years back. But no more. Data in any form can be accessed with just a minimal use of modern technology. A computer and internet connection, and you have access to any data of your institution.

The concept of anytime anywhere data is easily possible with the implementation of erp or education management in managing institutions effectively, with just a click of a mouse. Erp implementation or using education management software in institutions, customized according to individual needs, has benefits for all stakeholders students, parents, administrators and the management body also! The anytime anywhere data concept is easily viable to institutions powered by erp software solutions. Imagine, how beneficial it would be for administrators and members of managing body to get access to the institute irrespective of any kind of time and location constraints, thus a wonderful aid in times of emergency or urgent decision making. A one click access to information related to employees, students, academic is what is required in this technologically modified world. Access to administrative operations and functions are reduced to single click login, thus an effective management of institution is possible from anywhere, anytime.

But, when we talk about the accessibility of data in ERP, we should also keep in mind about the availability of data in ERP software; how can we make sure that data is available in the ERP software. Once data is available in the ERP, everything falls in place and the accessibility and analyzing of data is done with minimal effort. Here comes the focus of concern how is the data made available in the ERP; can there be a way to do it automatically? Like devices interconnected with each other would do auto data entry. Let’s put in the concept of Internet of Things in this place. How can this concept be of any use in this scenario? Well, Internet of Things, as we all know is a concept that talks about a future where every physical object is expected to connect to the internet and will be identifying themselves with other devices. That means, any object will be able to identify itself digitally, connected to the surrounding objects as well as database data. Think of a situation where computers will be collecting data without any human help and have all necessary information required and it will be all about the accountability, your ability to keep track of everything.

If Internet of Things can be put to use in education, it can create wonder for institutions. Interconnected devices in an institution can do the data entry without any help from administrators or teachers. Educators or teachers can save loads of time from inputting data to ERP software manually, thus investing the time in what they can do or expected to do best teaching. A very good example of how this kind of interconnected devices are a great boon to institution management is the Alndra Attendance management, an Artificial Intelligence enabled image processing technology to record attendance of classroom without any kind of manual interference. This kind of smart attendance requires just a mobile phone, with the app installed and take photos for attendance. Thus, a mobile phone connected with an education management software can create a lot of difference in your efforts towards effective institution management.

Fedena, the opensource software has been playing an active role in fulfilling the anytime anywhere data facilitator for thousands of institutions worldwide. A perfect school management software or an enterprise resource planning or a student information system, whatever you give it a role, it fits well. Anything related to education and management of educational institutions is carried out efficiently, by incorporating the power of internet, computer and modern technologies.